Minggu, 31 Januari 2016

Use your Apple Keyboard in Windows with Boot Camp

You can use an Apple keyboard or a keyboard designed for Microsoft Windows with your Mac. Some keys on your keyboard might work differently between OS X and Windows. 

Use Windows shortcuts on your Apple keyboard

Here's how keyboard functions are mapped to Apple keyboards by the Apple Keyboard Support driver in Windows.

All keyboards

Use these keys on your Apple keyboard for these Windows functions.

Windows logo:
 press Command (⌘)

Backspace or Delete: press Delete

Enter or ⏎:
 press Return

Alt (left):
 press Option

Alt GR (right):
 press Option + Control

Pause/Break:
 press fn + Esc

Applications: 
This key isn't available from Apple keyboards

Extended keyboard keys

If your keyboard doesn't include these keys, press these key combinations in Windows instead.

Insert:
 press fn + Return

Forward Delete: 
press fn + Delete

Home:
 press fn + left arrow
https://support.apple.com/en-ap/HT202676
End: 
press fn + right arrow

Page Up: 
press fn + up arrow

Page Down: 
press fn + down arrow

Number Lock:
 press fn + F6
Print Screen: press fn + Shift + F11

Print Active Window:
 press fn + Shift + Option + F11

Scroll Lock:
 press fn + Shift + F12

How to make a bootable OS X 10.11 El Capitan installer drive

A bootable installer drive is much more convenient when you're upgrading a Mac.


el cap public beta app


Editor’s note: We've updated this guide for the release version of El Capitan (OS X 10.11), which was released on September 30, 2015.
When OS X shipped on a DVD a good number of years ago, you always had the convenience of a bootable installer—an OS X installer that could be used to boot your Mac if its own drive was having problems. But to install or reinstall a recent version of OS X, you must either download a non-bootable installer from the Mac App Store or (via OS X’s invisible, bootable recovery partition) download 6GB of installer data from Apple’s servers during the installation process. In other words, you no longer have the same safety net or convenience.
Because of this, I recommend creating your own bootable El Capitan (OS X 10.11) installer drive on an external hard drive or USB thumb drive. If you need to install El Capitan on multiple Macs, using a bootable installer drive is faster and more convenient than downloading or copying the entire installer to each computer. If you want to erase the drive on a Mac before installing El Capitan, or start over at any time, you can use a dedicated installer drive to boot that Mac, erase its drive, and then install the OS (and subsequently restore whatever data you need from your backups). And if your Mac is experiencing problems, a bootable installer drive makes a handy emergency disk.
(OS X Recovery lets you repair your drive and reinstall OS X, but to perform the latter task, you must wait—each time you use it—for the entire 6GB of installer data to download. At best, that’s a hassle; at worst, it’s hours of waiting before you can get started.)
As with previous versions of OS X, it’s not difficult to create a bootable installer drive, but it’s not obvious, either. I show you how, below.
Macworld also has bootable-install-drive instructions forYosemite (OS X 10.10)Mavericks (OS X 10.9)Mountain Lion (OS X 10.8), and Lion (OS X 10.7).

Keep the installer safe

Like all recent versions of OS X, El Capitan is distributed through the Mac App Store: You download an installer app (called Install OS X El Capitan.app) to your Applications folder. In this respect, the OS X installer is just like any other app you buy from the Mac App Store. However, unlike any other app, if you run the OS X installer from that default location, the app deletes itself after it's done installing OS X.
If you plan to use the OS X installer on other Macs, or—in this case—to create a bootable installer drive, be sure to copy the installer to another drive, or at least move it out of the Applications folder, before you use it to install the OS on your Mac. If you don't, you'll have to redownload the installer from the Mac App Store before you can use the instructions below.

What you need

To create a bootable El Capitan installer drive, you need the El Capitan installer from the Mac App Store and a Mac-formatted drive that’s big enough to hold the installer and all its data. This can be a hard drive, a solid-state drive (SSD), a thumb drive, or a USB stick—an 8GB thumb drive is perfect. Your drive must be formatted as a Mac OS Extended (Journaled) volume with a GUID Partition Table. (Follow this tutorial to properly format the drive if you're using OS X Yosemite or older. If you're using OS X El Capitan, use these instructions.)
Your OS X user account must also have administrator privileges.

Apple’s gift: createinstallmedia

In my articles on creating a bootable installer drive for older versions of OS X, I provided three, or even four, different ways to perform the procedure, depending on which version of OS X you were running, your comfort level with Terminal, and other factors. That approach made sense in the past, but a number of the reasons for it no longer apply, so this year I’m limiting the instructions to a single method: using OS X's own createinstallmedia tool.
Starting with Mavericks, the OS X installer hosts a hidden Unix program called createinstallmedia specifically for creating a bootable installer drive. Using it requires the use of Terminal, but createinstallmedia works well, it's official, and performing the procedure requires little more than copying and pasting.
The only real drawback to createinstallmedia is that it doesn't work under OS X 10.6 Snow Leopard—it requires OS X 10.7 Lion or later. Though it's true that some Macs still running Snow Leopard can upgrade to El Capitan, I think it’s safe to assume that most people installing OS X 10.11 will have access to a Mac running 10.7 or later.
(If you absolutely refuse to go near Terminal, an El Capitan-compatible version of DiskMaker X is now available, although I haven't yet had the chance to test it.)

Making the installer drive

  1. Connect to your Mac a properly formatted 8GB (or larger) drive, and rename the drive Untitled. (The Terminal commands I provide here assume that the drive is named Untitled. If the drive isn’t named Untitled, the procedure won’t work.)
  2. Make sure the El Capitan installer (or at least a copy of it), called Install OS X El Capitan.app, is in its default location in your main Applications folder (/Applications).
  3. Select the text of the following Terminal command and copy it.
    sudo /Applications/Install\ OS\ X\ El\ Capitan.app/Contents/Resources/createinstallmedia --volume /Volumes/Untitled --applicationpath /Applications/Install\ OS\ X\ El\ Capitan.app --nointeraction
  4. Launch Terminal (in /Applications/Utilities).
  5. Warning: This step will erase the destination drive or partition, so make sure that it doesn’t contain any valuable data. Paste the copied command into Terminal and press Return.
  6. Type your admin-level account password when prompted, and then press Return.
  7. You may see the message “To continue we need to erase the disk at /Volumes/Untitled. If you wish to continue type (Y) then press return:” If so, type the letter Y and then press Return. If you don't see this message, you're already set.
createinstallmedia in terminal final
The Terminal window displays createinstallmedia’s progress as a textual representation of a progress bar: Erasing Disk: 0%... 10 percent...20 percent...and so on. You also see a list of the program’s tasks as they occur: Copying installer files to disk... Copy complete. Making disk bootable... Copying boot files... Copy complete. The procedure can take as little as a couple minutes, or as long as 20 to 30 minutes, depending on how fast your Mac can copy data to the destination drive. Once you see Copy Complete. Done., as shown in the screenshot above, the process has finished.
Createinstallmedia will have renamed your drive from Untitled to Install OS X El Capitan. You can rename the drive (in the Finder) if you like—renaming it won’t prevent it from working properly.

Booting from the installer drive

You can boot any El Capitan-compatible Mac from your new installer drive. First, connect the drive to your Mac. Then, restart your Mac (or, if it's currently shut down, start it up) while holding down the Option key. When OS X’s Startup Manager appears, select the installer drive and then click the arrow below it to proceed with startup. (Alternatively, if your Mac is already booted into OS X, you may be able to choose the installer drive in the Startup Disk pane of System Preferences, and then click restart. However, sometimes OS X installer drives don't appear in the Startup Disk window.)
Once booted from your installer drive, you can perform any of the tasks available from the OS X installer’s special recovery and restore features. In fact, you'll see the same OS X Utilities screen you get when you boot into OS X Recovery—but unlike with recovery mode, your bootable installer includes the entire installer.


sudo /Applications/Install\ OS\ X\ Yosemite.app/Contents/Resources/createinstallmedia --volume /Volumes/Untitled --applicationpath /Applications/Install\ OS\ X\ Yosemite.app --nointeraction
http://www.macworld.com/article/2981585/operating-systems/how-to-make-a-bootable-os-x-10-11-el-capitan-installer-drive.html

Selasa, 26 Januari 2016

How to Resolve 'The file is corrupted and cannot be opened' Error of MS Word

 
Though the newer versions of MS Word offer you more useful and efficient features, it is sometimes seen that files of older versions deny opening with the newer versions. Additionally, when you try to open an older version file in new version, it gets corrupt and denies opening. One such problem occurs when MS Word users upgrade to Word 2010 from 2007. An error message that users encounter when they try to open their Word file after this upgrade is as follows:

However, the error is not limited to MS Word file only; instead, it can be found in MS Excel 2010 and MS PowerPoint 2010 after upgrading from their 2007 versions. Mentioned below are some of the common methods to resolve this problem:

"The file is corrupted and cannot be opened"

Change the 'Trust Center' Settings: Sometimes, the enabled protected view settings under 'Trust Center' prevent the Word file from opening. Mentioned below are the steps to change the settings of 'Trust Center':

Open your MS Word application.

Click 'File >> Options'.

Select the 'Trust Center' and press button under 'Trust Center Settings'.

Click 'Protected View'.

Uncheck all the options available under 'Protected View' and click 'OK' to confirm.

Restart MS Word and now, try to open your corrupt Word document.

Manual Setting of 'Component Security':  To change these settings to default settings, follow the below mentioned steps:

Go to 'Start' and in the search box, type 'dcomcnfg'. After that, select 'dcomcnfg' from the program list.

Go to the navigation pane and expand the 'Component Services'. Then, go to 'Computers' and expand it. After that, right click on 'My Computer', and then click 'Properties'.

Open the 'Default Properties' tab and set the following values:
    • Default Authentication Level: Connect
    • Default Impersonation Level: Identify
    • Then, click 'OK'.

If none of the above-mentioned methods is able to do any needful for you, then use of a professional Word recovery software like Stellar Phoenix Word Recovery is recommended. This efficient Word recovery software repairs corrupt Word file and restores all the data stored in it without altering its original formatting. 
 http://www.stellarinfo.com/support/kb/index.php/article/resolve-word-error-file-is-corrupted-and-cannot-be-open

Senin, 25 Januari 2016

Windows Server 2012 Remove Password Complexity

The password does not meet the password policy requirements, just follow these steps to Disable Password complexity in Windows Server 2012
  1. In the Server Manager click on Tools and from the drop down click Group Policy Management
  2. Expand Forrest >> Domains >> Your Domain Controller.
  3. Right click on the Default Domain Policy and click on the Edit from the context menu.
  4. Now Expand Computer Configuration -> Policies -> Windows Settings -> Security Settings -> Account Policies -> Password Policy
  5. Double-click on the Passwords Must Meet Complexity Requirements option in the right pane.
  6. Select Disabled  under define this policy setting:
  7. Click Apply then OK all the way out and close the GPO window.
  8. In order to refresh the policy type the following command: “gpupdate /force”  in the CMD window and click ENTER.
https://www.youtube.com/watch?v=uKRJyvFfEOk

Video Tutorial:

http://www.avoiderrors.net/windows-server-2012-remove-password-complexity/

Step by step Installasi Windows Server 2012 dan Active Directory atau Domain Controller Server ( Bagian 2 – AD Domain Services Configuration )


4 Votes

XPS-Windows-2012-Logo

Penulis Artikel : Nathan Gusti Ryan
 Setelah kita selesai melakukan installasi OS Windows Server 2012, seperti artikel sebelumnya :
Step by step Installasi Windows Server 2012 dan Active Directory atau Domain Controller Server ( Bagian 1 – OS Installation )
Maka selanjutnya dalam tutorial ini kita akan melakukan konfigurasi Windows Server 2012 ini menjadi Active Directory Server atau Domain Controller Server.
Apa sih fungsi dari Active Directory / Domain Controller Server ini?
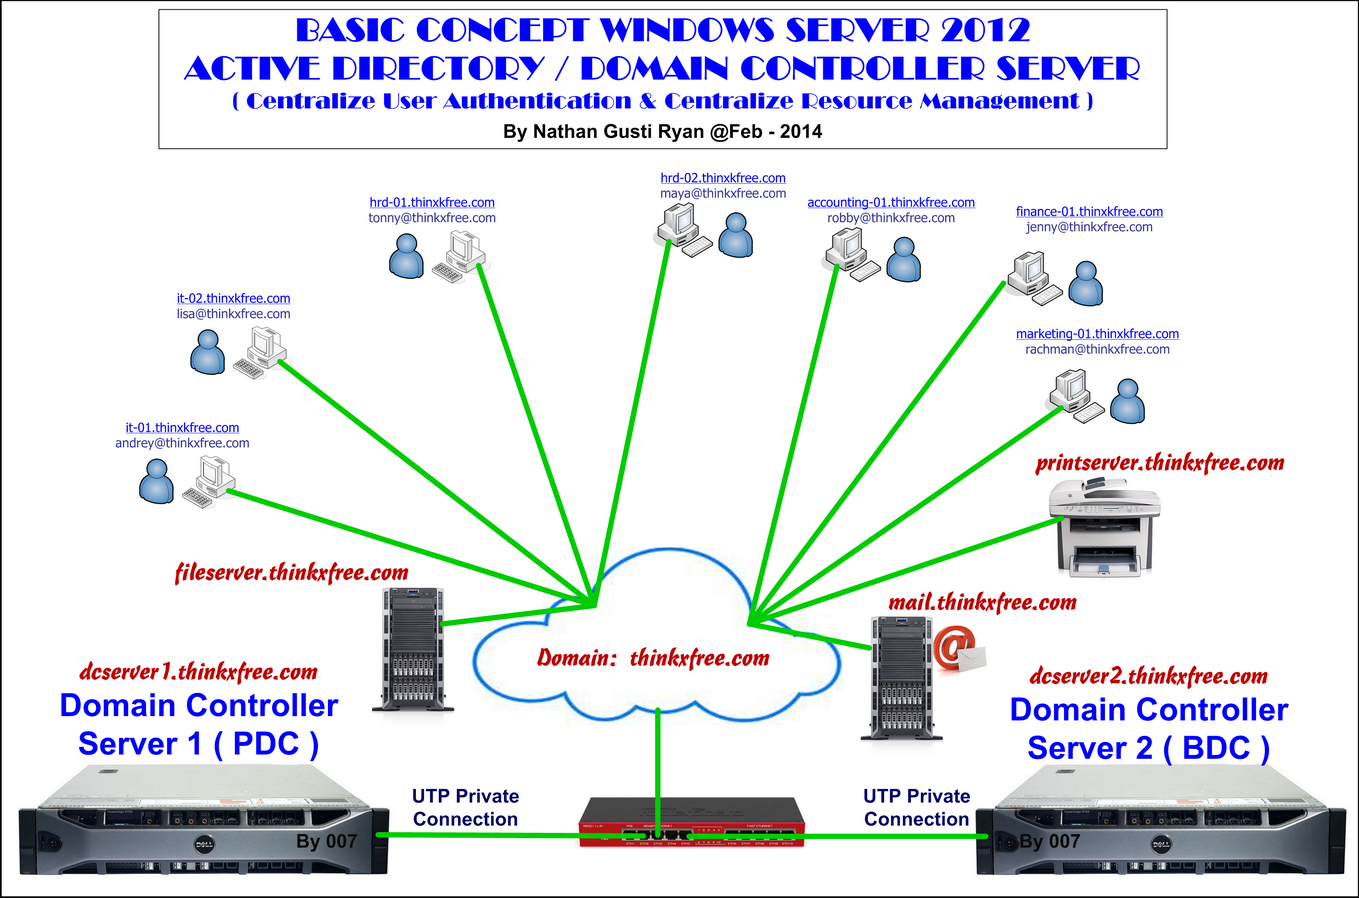
Yaitu untuk melakukan Centralize User Authentication & Centralize Resource Network.
 
Dan contoh simplenya ini seperti apa?
Okey, sekarang coba amati System Komputerisasi yang ada di sekitar kita, misalnya dalam jaringan LAN kita. Jika kita tidak mengunakan  Active Directory Server atau Domain Controller Server maka kita akan mengunakan Workgroup. Pada jaringan Workgroup memang semua komputer dalam jaringan LAN bisa saling berkomunikasi dan bisa saling sharing namun masing-masing komputer ini independent alias berdiri sendiri-sendiri. Kalau mau mengakses Printer Sharing atau Folder Sharing pasti harus melakukan konfigurasi Authentikasi satu per-satu. Karena Account dan Password masing-masing komputer hanya terpasang pada satu komputer itu saja.
So, kalau mau mengunakan komputer lain dalam jaringan LAN maka harus mengunakan account yang ada di komputer tersebut atau mesti dibuatkan account lebih dulu. Iya kan???
Ribet tahu….!!!
Hal ini berbeda dengan jaringan LAN yang mengunakan Active Directory Server atau Domain Controller Server. Account setiap User cukup di buat 1 saja di AD / DC Server, selanjutnya dia bisa Login pada komputer manapun ( yang sudah diberikan hak akses ), mengakses File Server dengan mudah, File Departemen atau perbagian-nya dengan mudah, dapat mengakses Resource Network yang lain dengan mudah ( misalnya Printer Server / Printer Sharing, Shared Scanner, maupun resource yang lain. Bahkan bisa diintegrasi dengan Email Account dengan MS Exchange Server , MS Share Point Server, IIS Intranet WebServer, Database MS SQL Server maupun Aplikasi ERP, dll dengan mudah bila diintegrasi Account AD / DC Server ini sebagai Single Sign On ( SSO ).
Okey… Pemanasan tadi kita lanjutkan dengan Contoh Desain Layout implementasi AD / DC Server di bawah ini :
XPS-Server-Design-(AD-Windows-Server-Concept)-Resize
How to implementing Active Directory / Domain Controller Server?
Anda penasaran…???? ( Sama…! Saya juga…! ).
Persiapan awal yang harus dipahami adalah requirement atau Spesifikasi Server / VM yang dibutuhkan untuk installasi Active Directory Windows server 2012 adalah :
  1. CPU atau vCPU minimal 1 Core 1,6 Ghz. Sebaiknya disediakan 2 Core Processor.
  2. Memory atau vRAM minimal 2 GB untuk Windows Server-nya saja. Sebaiknya disediakan 4 GB agar fungsi AD DS untuk bisa lancar.
  3. Harddisk atau vHDD minimal 100 GB untuk installasi OS Windows Server-nya saja. Sebaiknya disediakan > 200 GB.
  4. Ethernet / NIC atau vNIC disediakan sebuah ethernet 1 Gbps ataupun lebih dari 1 ethernet.
Selanjutnya setelah paham akan pengunaan dan konsep Active Directory Server atau Domain Controller Server, kita lanjutkan dengan cara konfigurasi-nya seperti panduan dibawah ini :
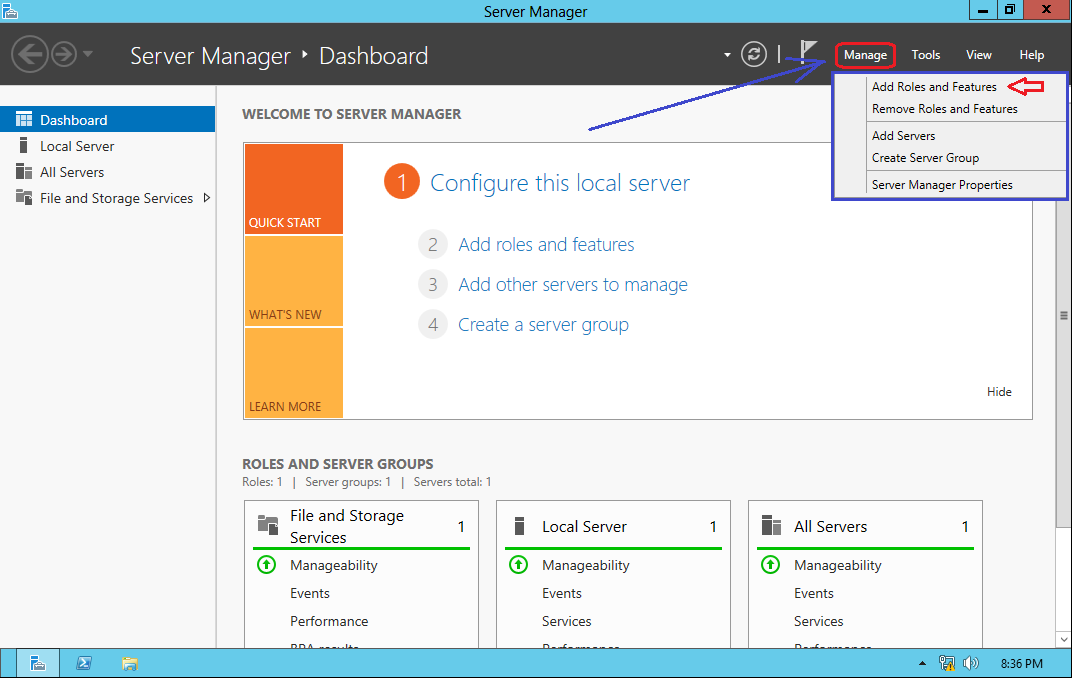
1. Setelah kita selesai installasi OS Windows Server 2012 dan Server sudah ready maka selanjutnya pada Server Manager, lihat di pojok kanan atas ada menu Manage. Kita klik dan akan muncul menu seperti gambar dibawah ini. Lalu kita pilih Add Roles and Features.
Install-Active-Directory-Win2012-DC-Server-001
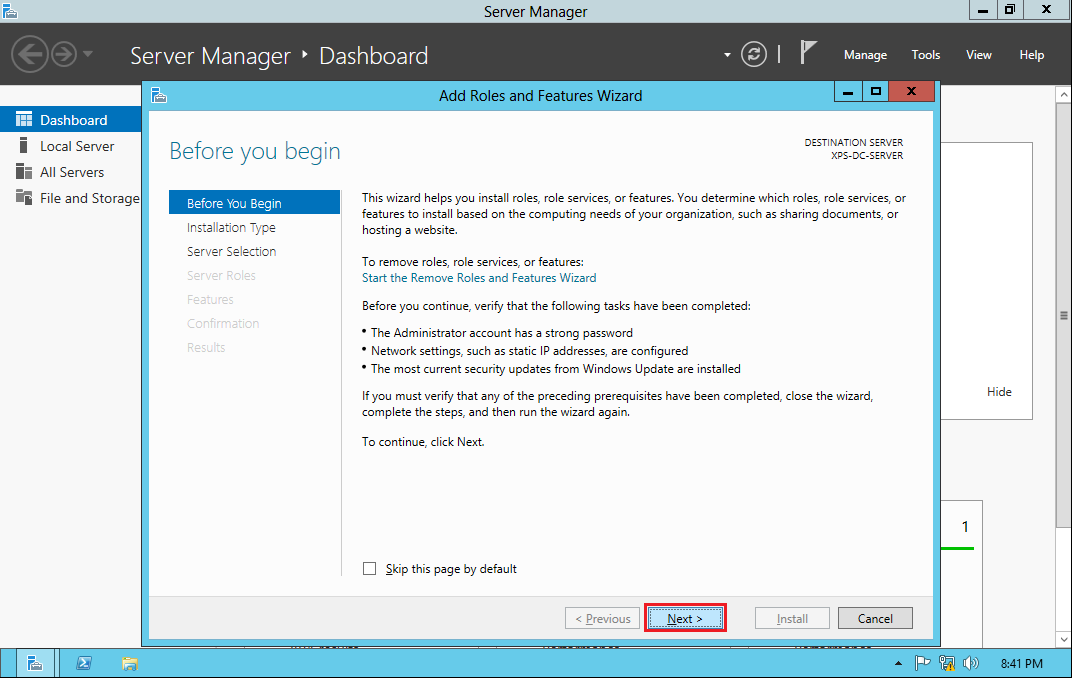
2. Selanjutnya akan tampil wizard seperti dibawah ini, lalu kita klik Next.
Install-Active-Directory-Win2012-DC-Server-002
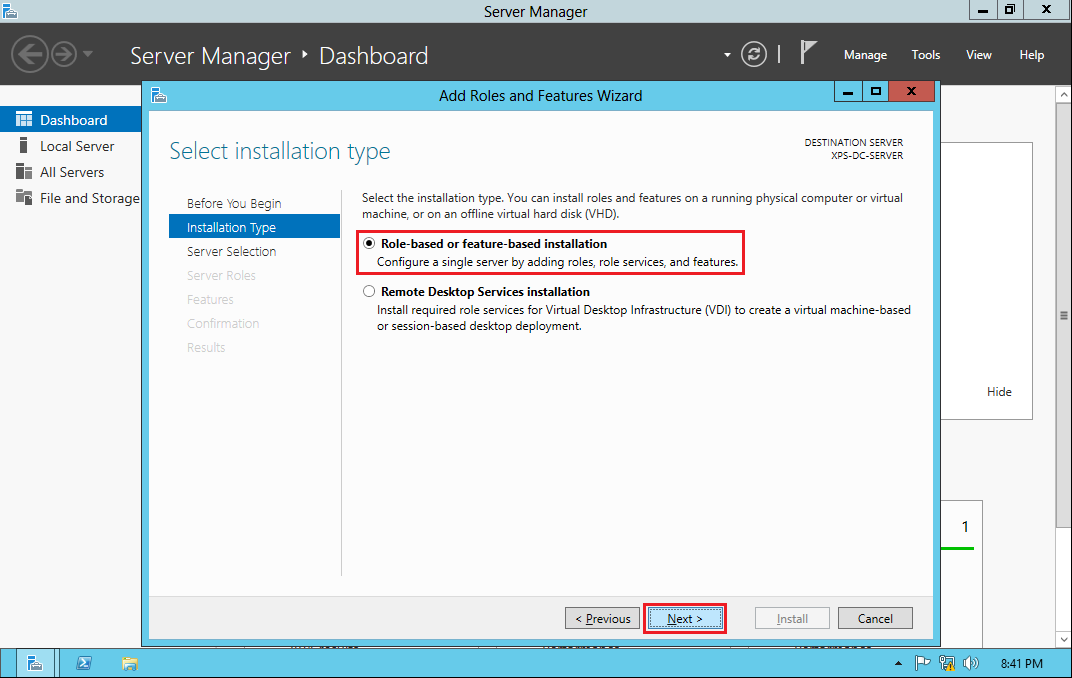
3. Selanjutnya kita pilih menu Role based or feature based installation, lalu kita klik Next.
Install-Active-Directory-Win2012-DC-Server-003
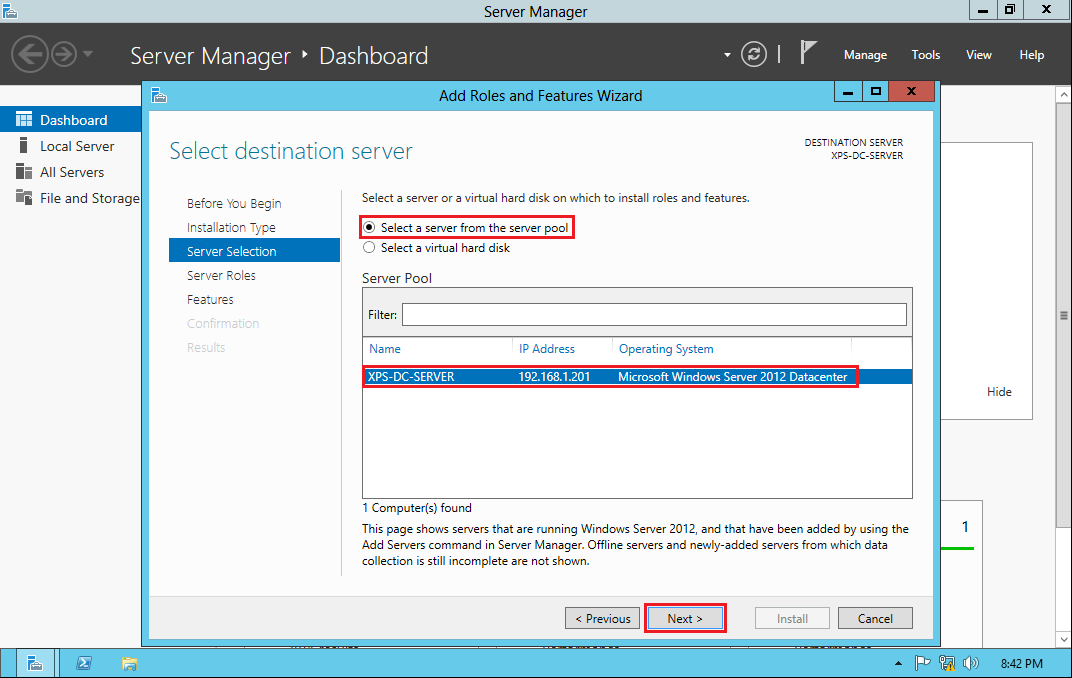
4. Selanjutnya kita pilih server yang akan kita tambahkan Roles & features-nya, lalu kita klik Next.
Install-Active-Directory-Win2012-DC-Server-004
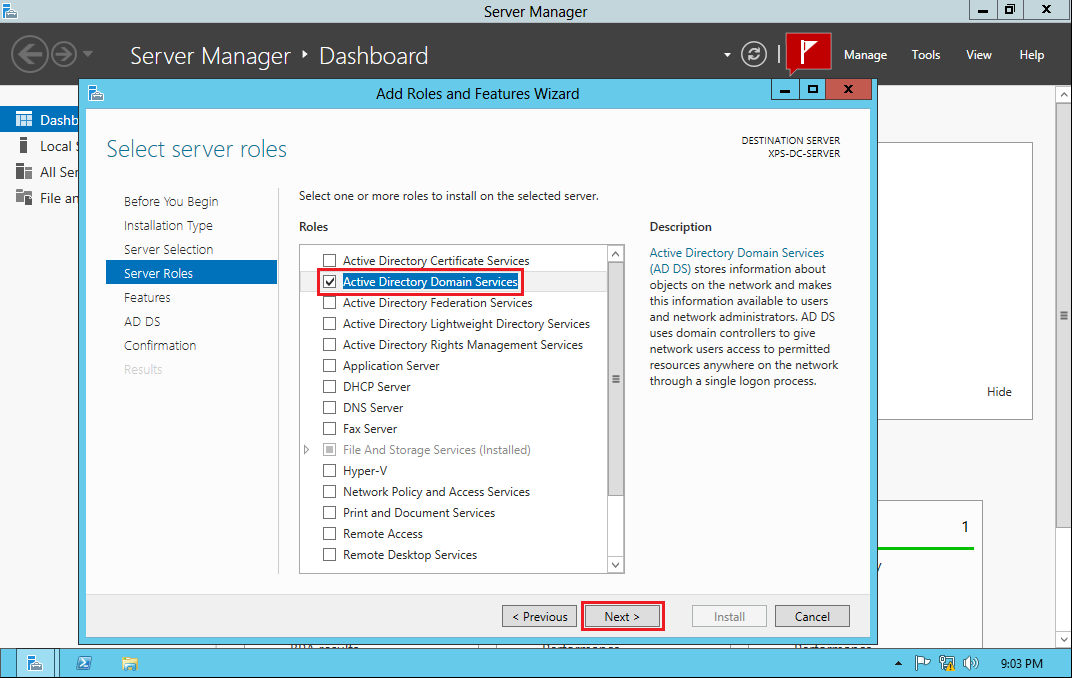
5. Selanjutnya kita klik / check mark pilihan Active Directory Domain Services. Lalu kita klik Next.
Install-Active-Directory-Win2012-DC-Server-005
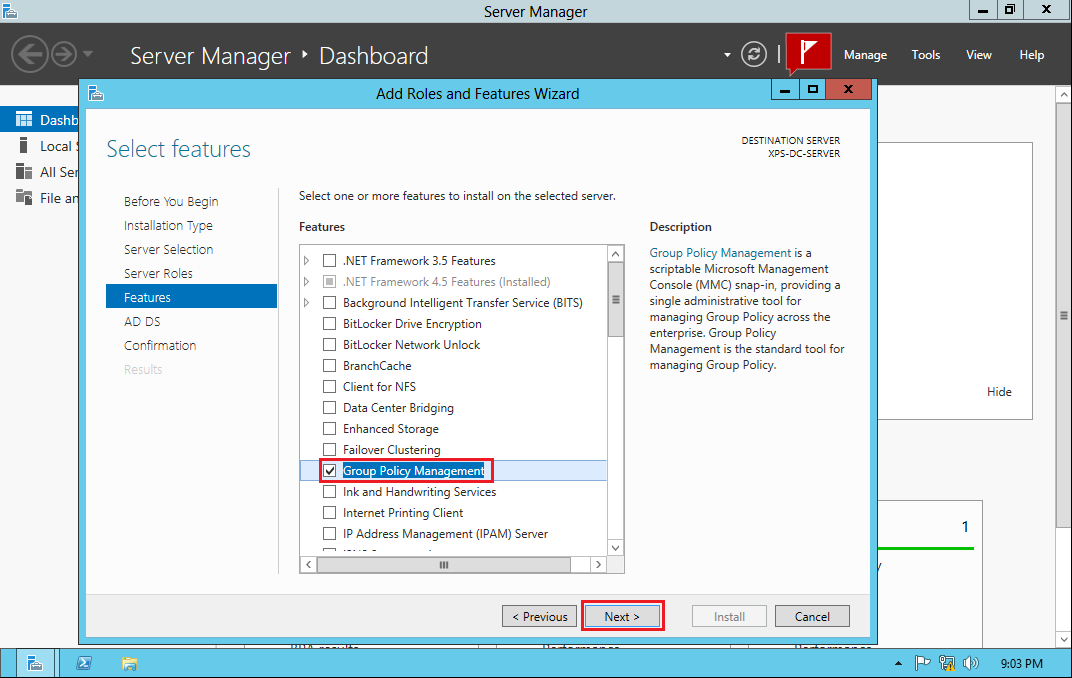
6. Selanjutnya pada pilihan features dibawah ini kita pilih Group Policy Management, lalu kita klik Next.
Install-Active-Directory-Win2012-DC-Server-006
7. Selanjutnya ditampilkan keterangan dibawah ini, lalu kita klik Next.
Install-Active-Directory-Win2012-DC-Server-007
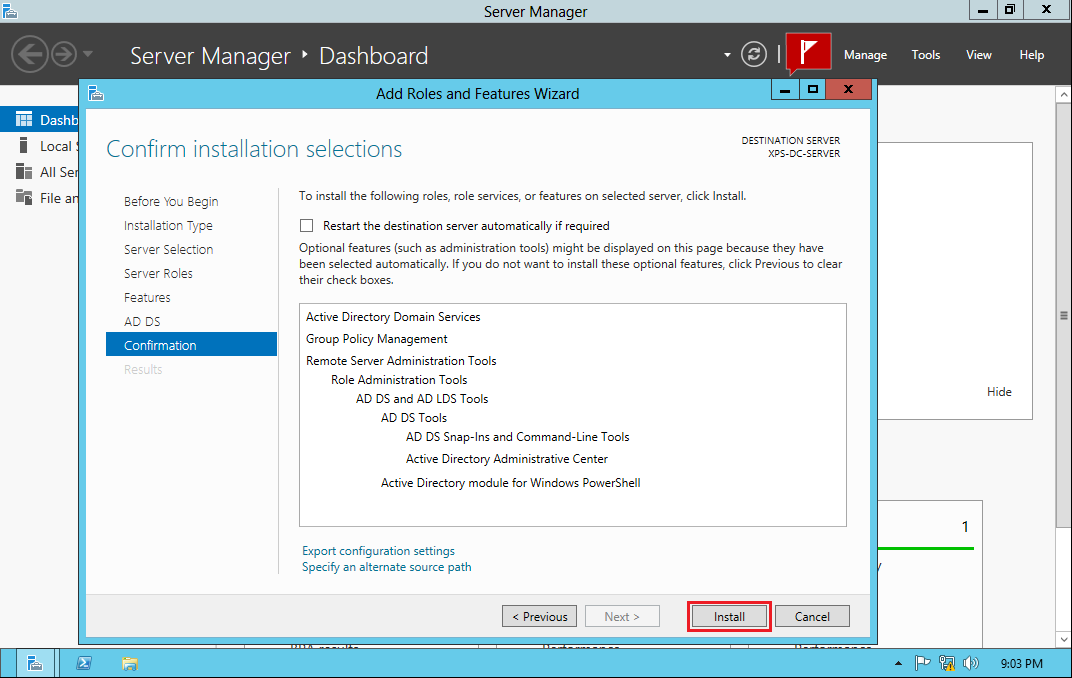
8. Tahap selanjutnya adalah proses Installasi seperti gambar dibawah ini, lalu kita klikInstall.
Install-Active-Directory-Win2012-DC-Server-008
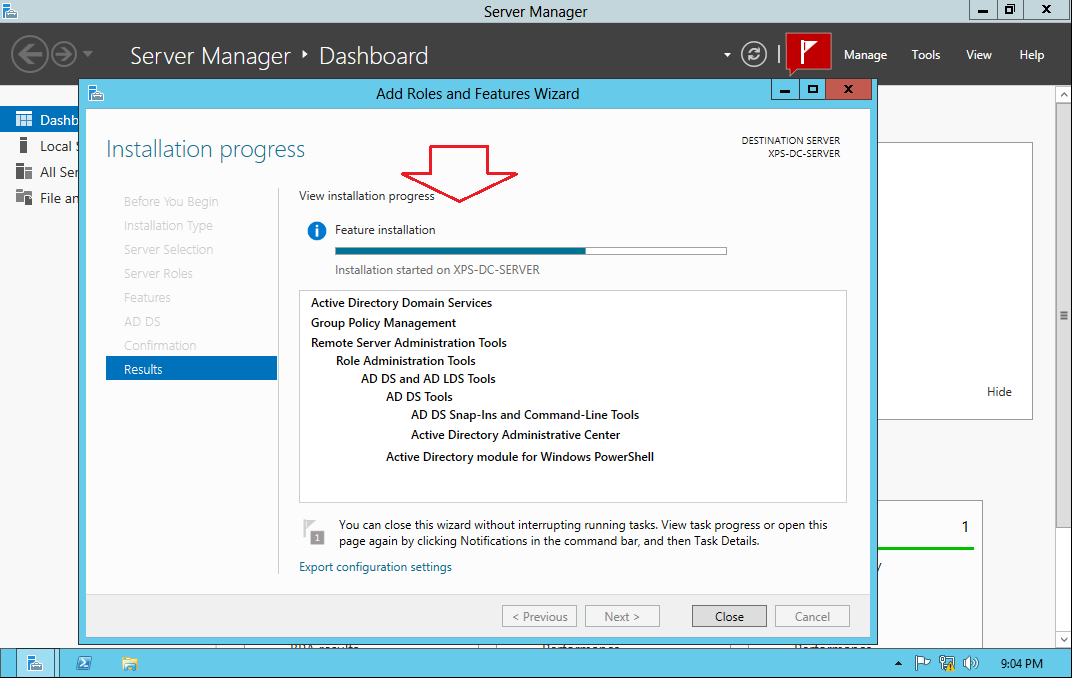
9. Tunggu hingga proses installasi selesai sambil ngopi-ngopi plus makan snack…
Install-Active-Directory-Win2012-DC-Server-009
10. Setelah proses installasi selesai, selanjutnya kita klik Close.
Install-Active-Directory-Win2012-DC-Server-010
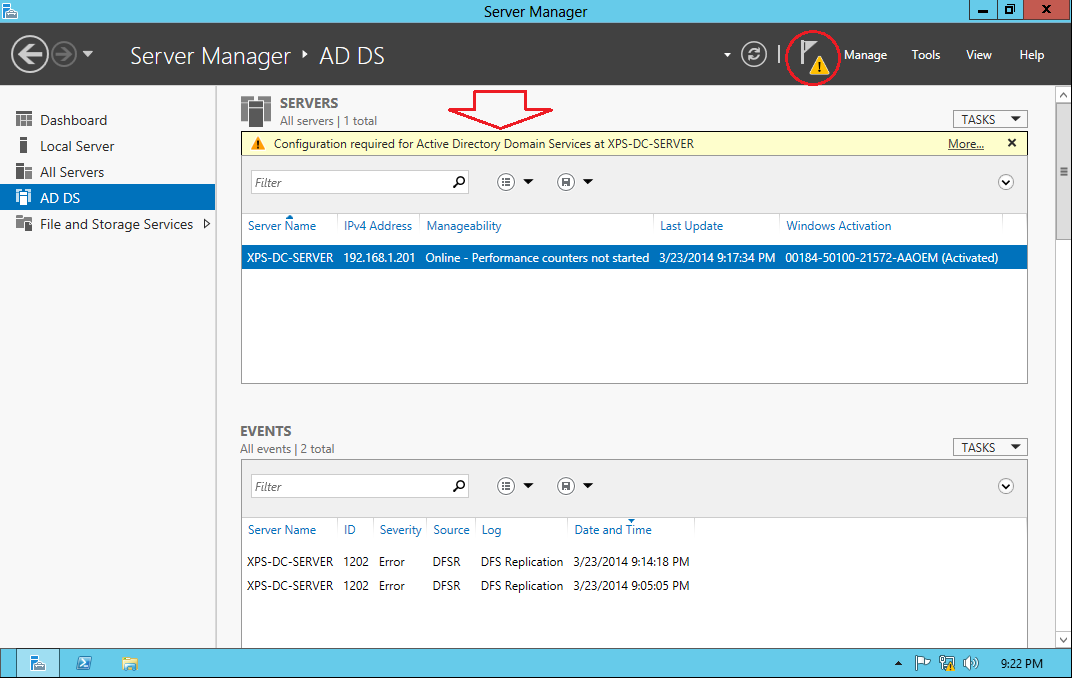
11. Selanjutnya pada menu utama Server Manager, sudah muncul menu baru yaitu AD DSserta ada peringatan lanjutan konfigurasi dengan mengklik Simbol warning dalam lingkaran merah.
Install-Active-Directory-Win2012-DC-Server-011
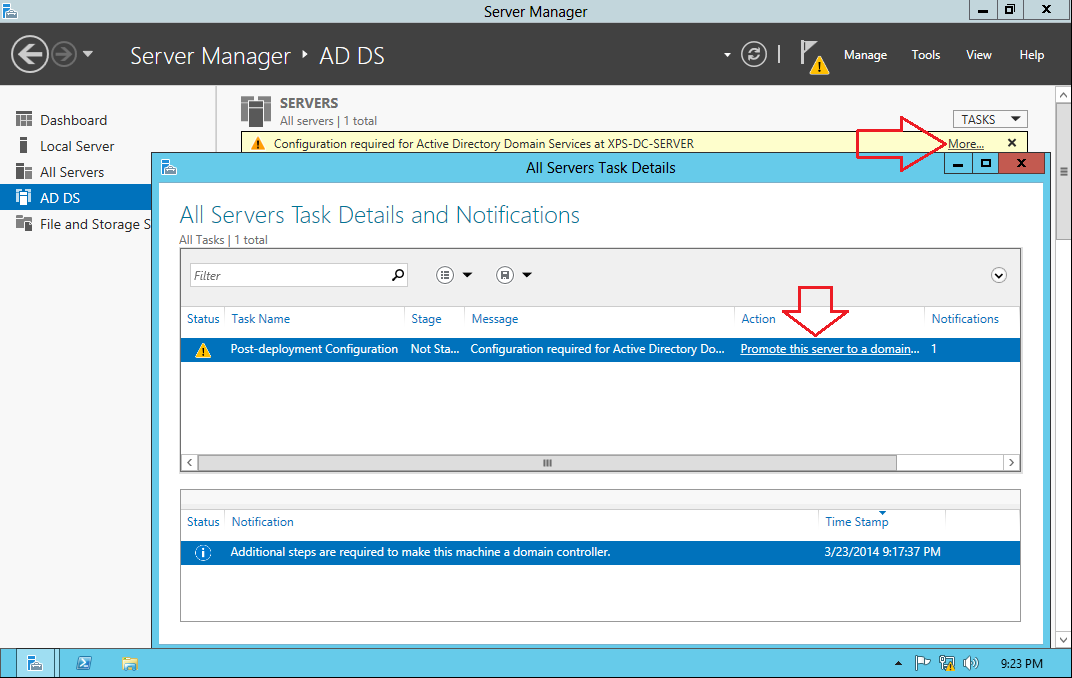
12. Selanjutnya tampil gambar seperti dibawah ini, lalu kita klik Promote this server to a domain. ( Artinya setelah kita install Role dan Features AD DS, proses selanjutnya adalahmempromosikan Server ini menjadi Domain Controller Server ).
Install-Active-Directory-Win2012-DC-Server-012
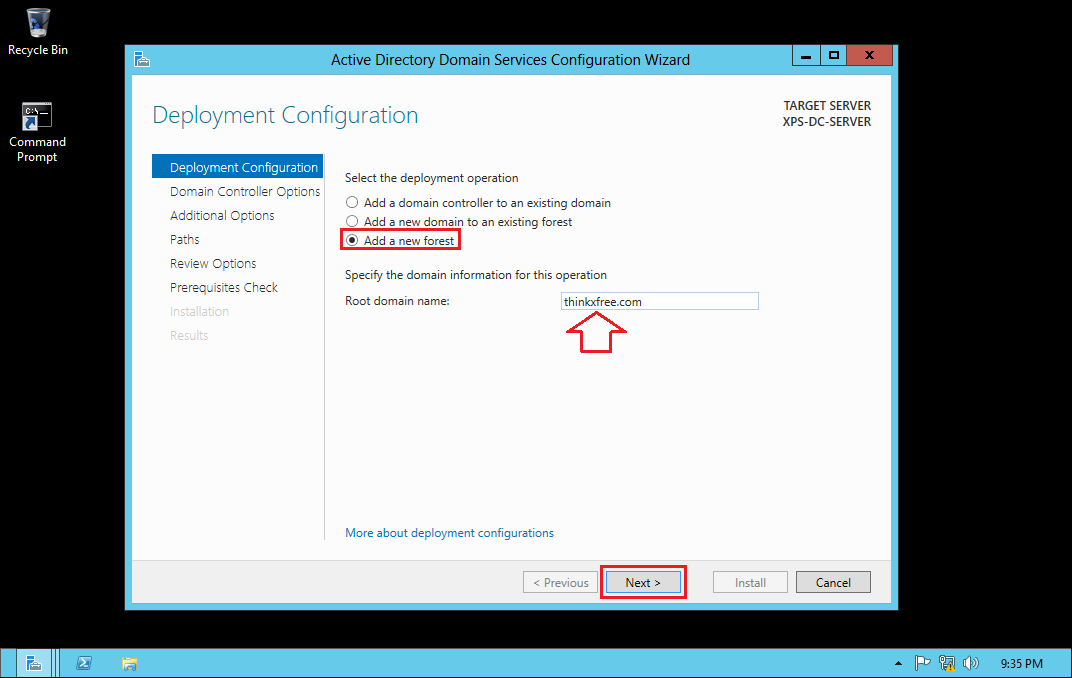
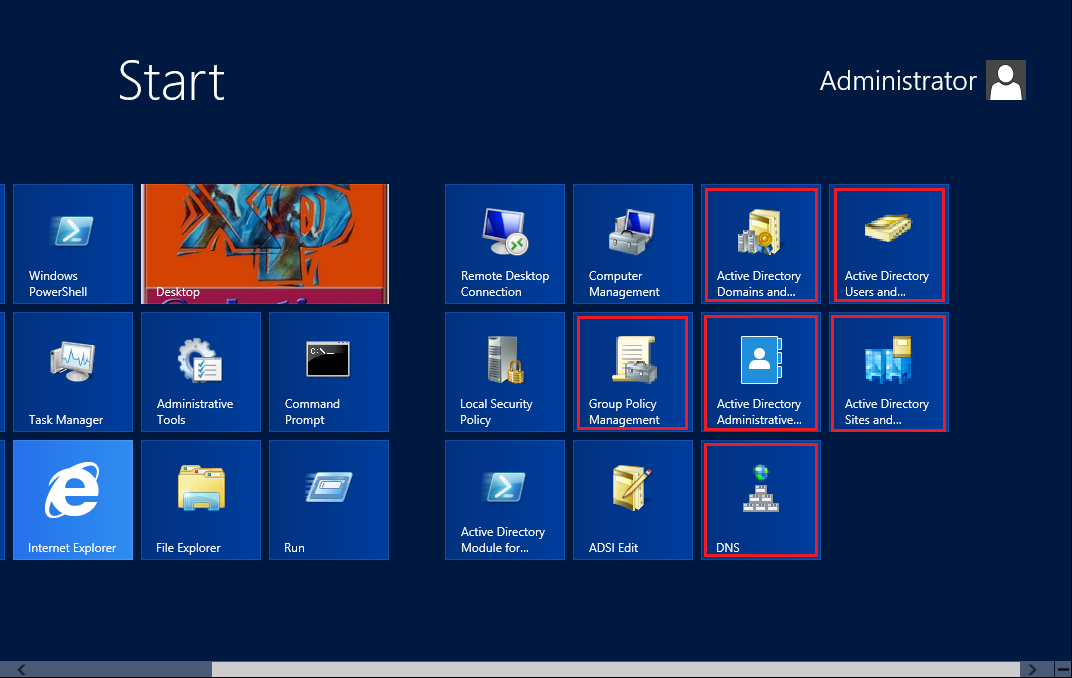
13. Langkah selanjutnya setelah muncul tampilan dibawah ini, kita pilih menu Add new forrest dan menentukan nama domain ( misalnya : thinkxfree.com ). Lalu kita klik Next.
Install-Active-Directory-Win2012-DC-Server-013
14. Selanjutnya akan tampil gambar dibawah ini, pada opsi Specity domain controller capabilities kita checkmark pada Domain Name System ( DNS ) Server, Global Catalog ( GC ), serta mengisi password DSRM ( Directory Services Remote Mode ).
Penjelasannya : bahwa Server AD DS kita ini akan berfungsi juga sebagai Global Catalog Server ( yang menghandle seluruh data domain Thinkxfree.com ) dan sebagai DNS Server (harus menjadi Local DNS Server bagi jaringan Domain kita ).
Install-Active-Directory-Win2012-DC-Server-014
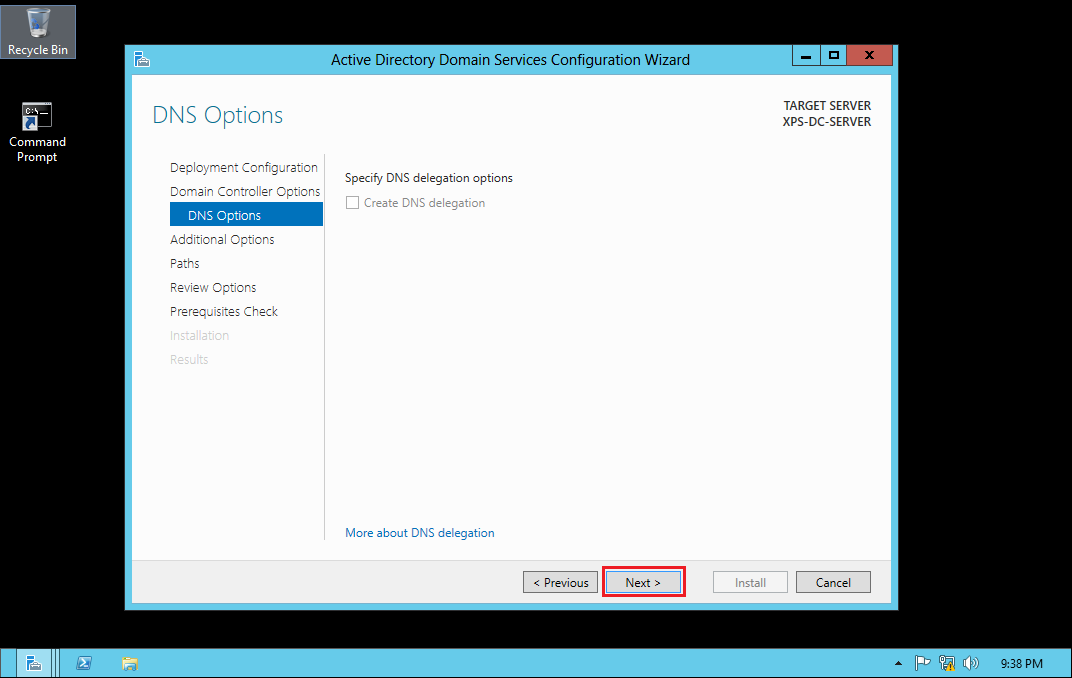
15. Setelah kita klik Next, akan tampil menu dibawah ini ( Specify DNS delegation options). Lalu kita klik Next.
Install-Active-Directory-Win2012-DC-Server-015
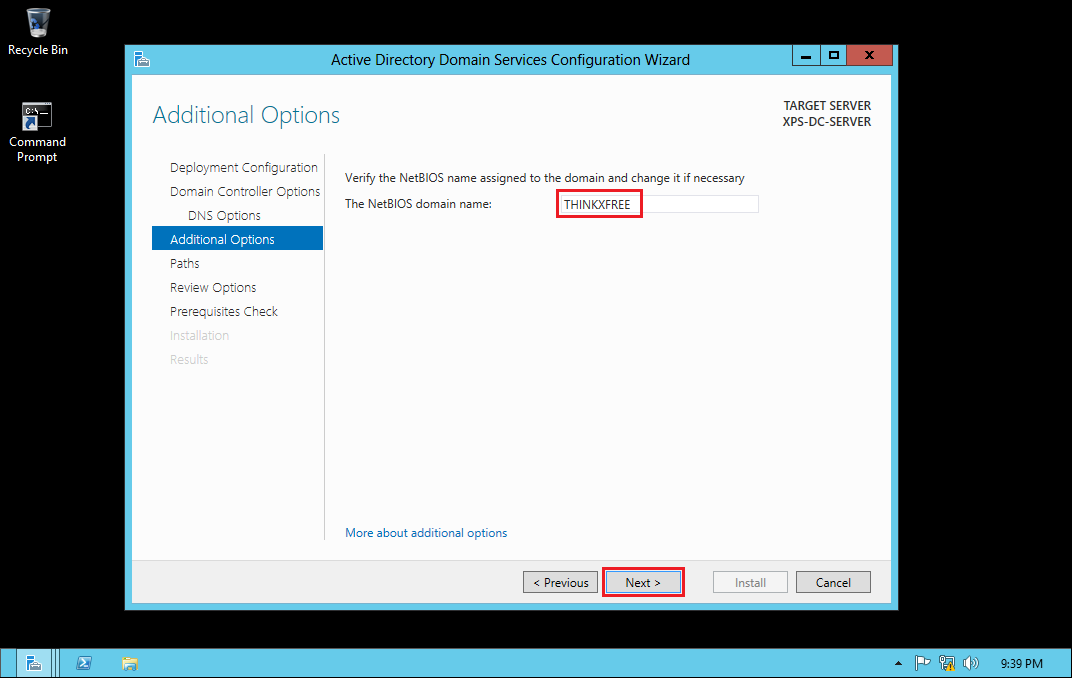
16. Setelah akan tampil NetBIOS domain name THINKXFREE ( atau nama domain anda masing-masing ), lalu kita klik Next.
Install-Active-Directory-Win2012-DC-Server-016
17. Selanjutnya akan ditampilkan informasi mengenai lokasi penempatan AD DS Database, Log Files dan SYSVOL ( shared folder Login akses user domain, termasuk penempatan Login Script ). Lalu kita klik Next.
Install-Active-Directory-Win2012-DC-Server-017
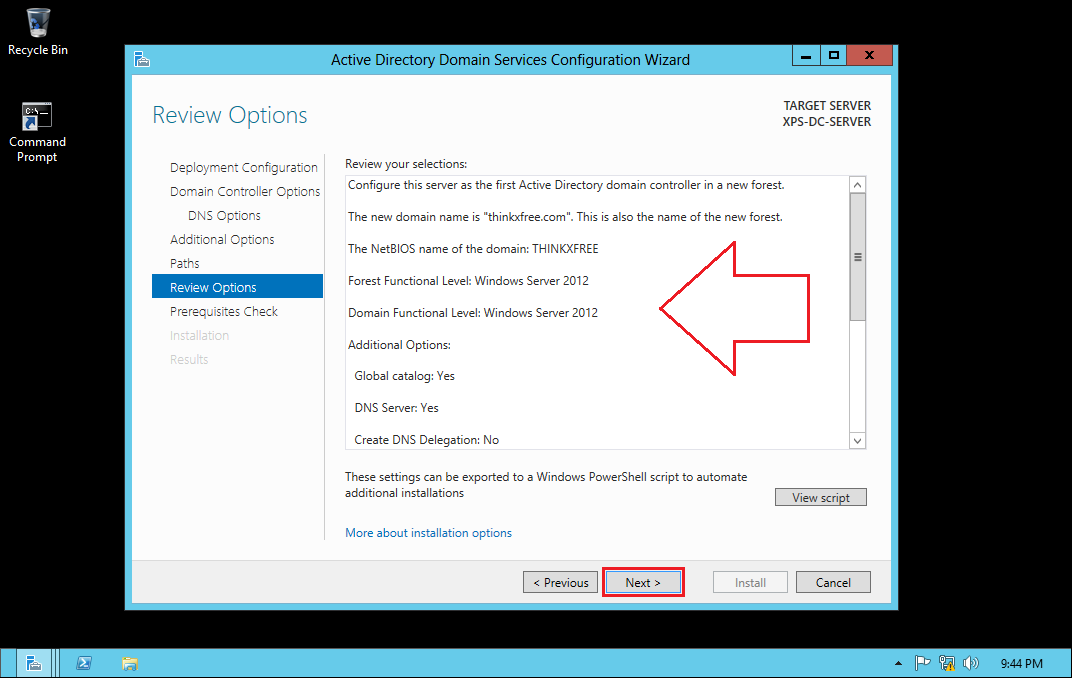
18. Lalu akan tampil review dari konfigurasi yang telah kita pilih tadi dan selanjutnya kita klik Next.
Install-Active-Directory-Win2012-DC-Server-018
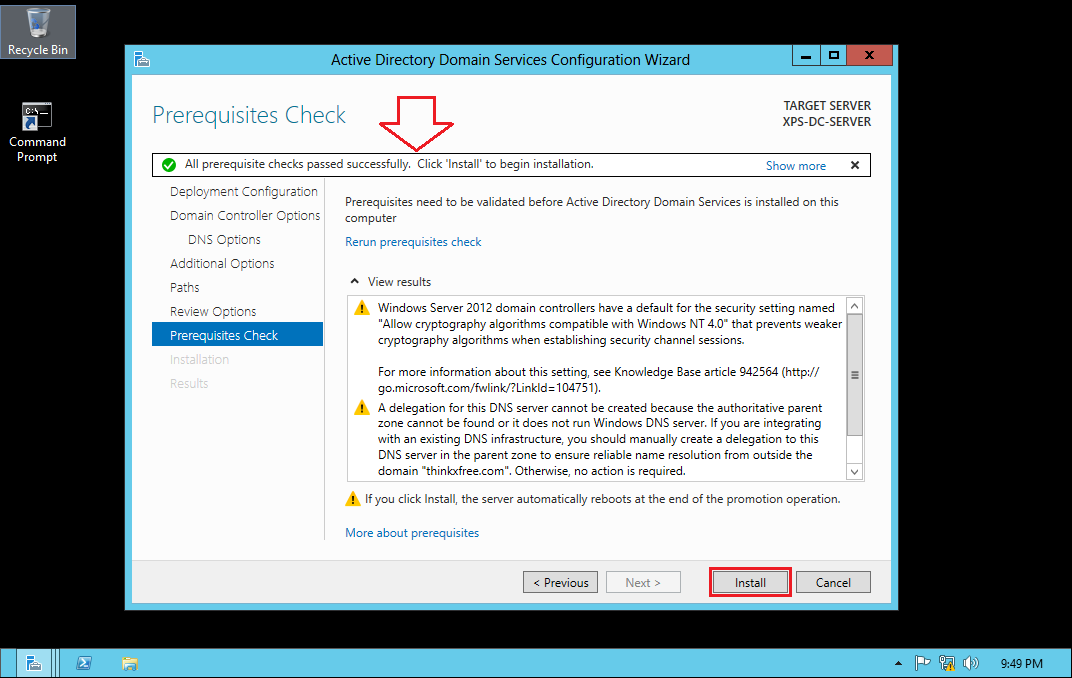
19. Selanjutnya akan ditampilkan informasi Prerequisite pada konfigurasi AD DS kita. Lalu kita klik Install.
Install-Active-Directory-Win2012-DC-Server-019
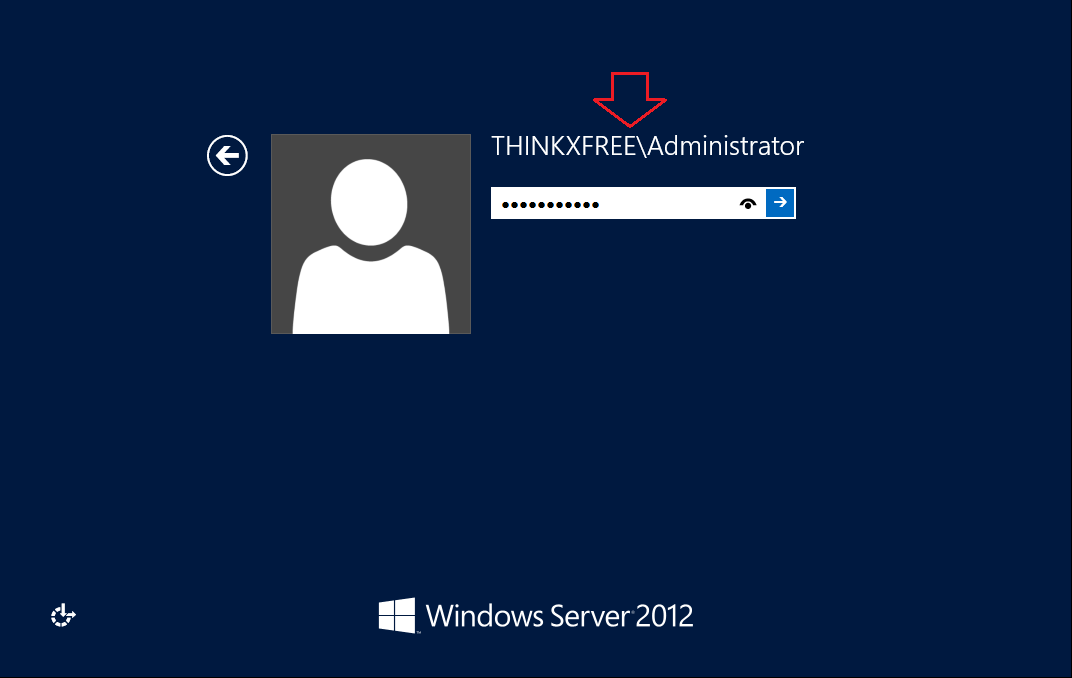
20. Setelah proses installasi selesai, maka selanjutnya Server kita akan melakukan Restart. Dan setelah server Up kembali akan muncul Login Account yang berbeda dengan Login Local Admin Account sebelumnya. Disini akan muncul nama Domain yang telah kita buat tadi. Selanjutnya kita masukkan Password Domain Administrator.
Install-Active-Directory-Win2012-DC-Server-020
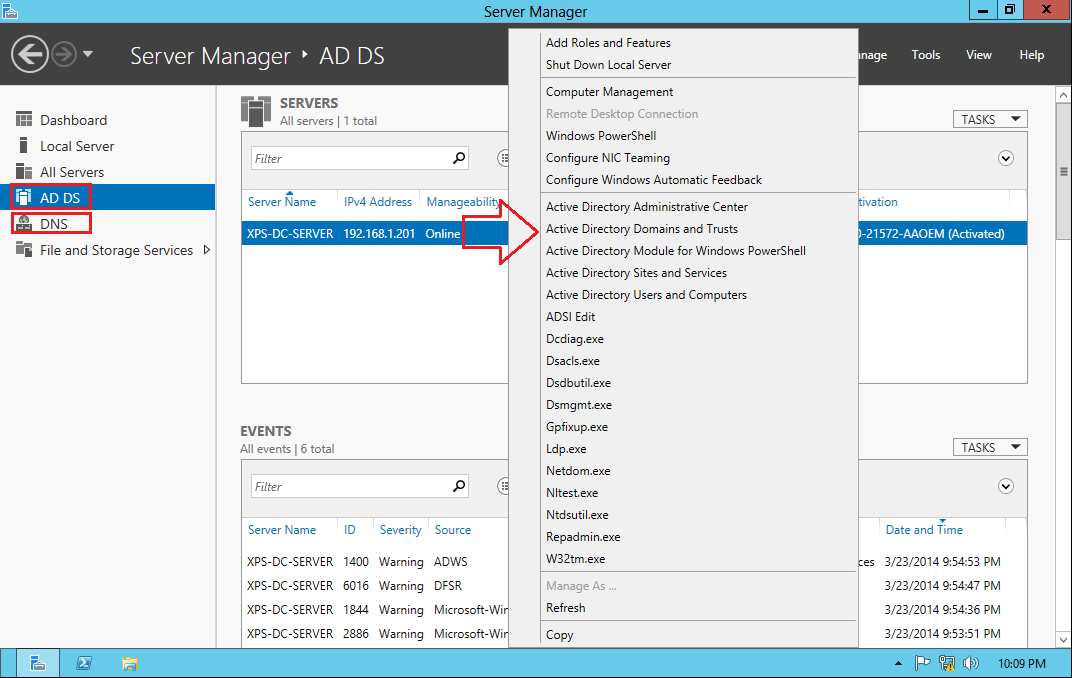
21. Selanjutnya pada menu utama Server Manager sudah tampak menu utama, yaitu AD DS dan DNS. Lalu pada menu utama AD DS kita klik kanan nama server kita dan akan muncul deretan menu gambar dibawah ini. Kita pilih menu Active Directory Users and Computers untuk kita lakukan konfigurasi lebih lanjut dalam membuat User dan Group Policy Security serta pengaturan User sesuai departemen kerjanya.
Install-Active-Directory-Win2012-DC-Server-021
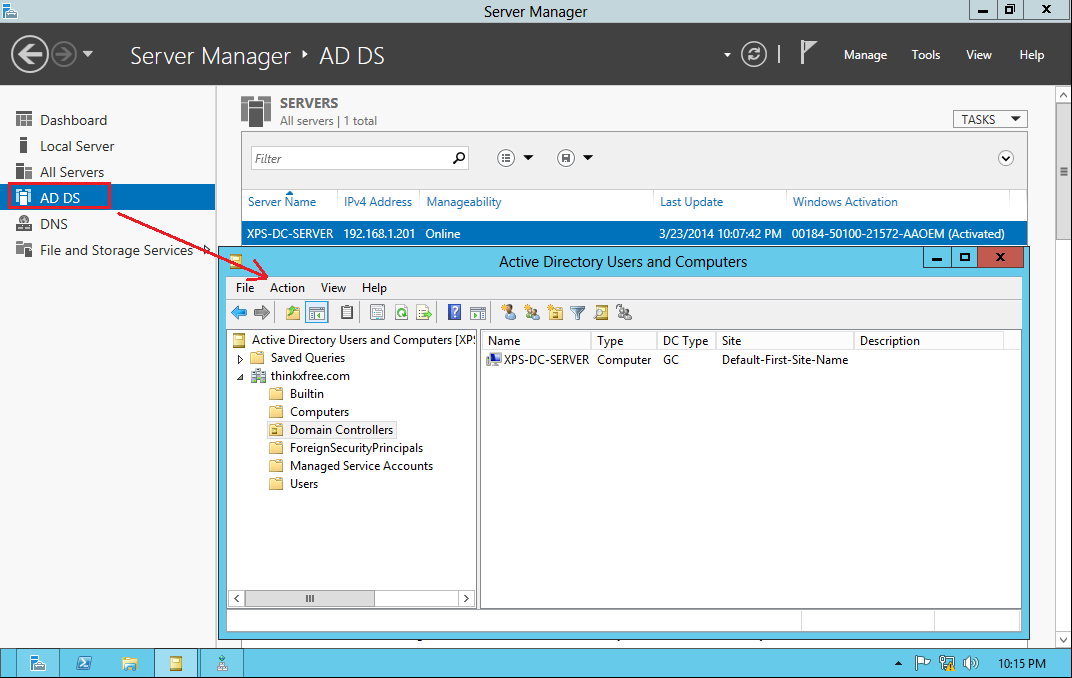
22. Pada menu Active Directory Users and Computers tampak nama server AD DS kita ini dalam group Domain Controllers.
Install-Active-Directory-Win2012-DC-Server-022
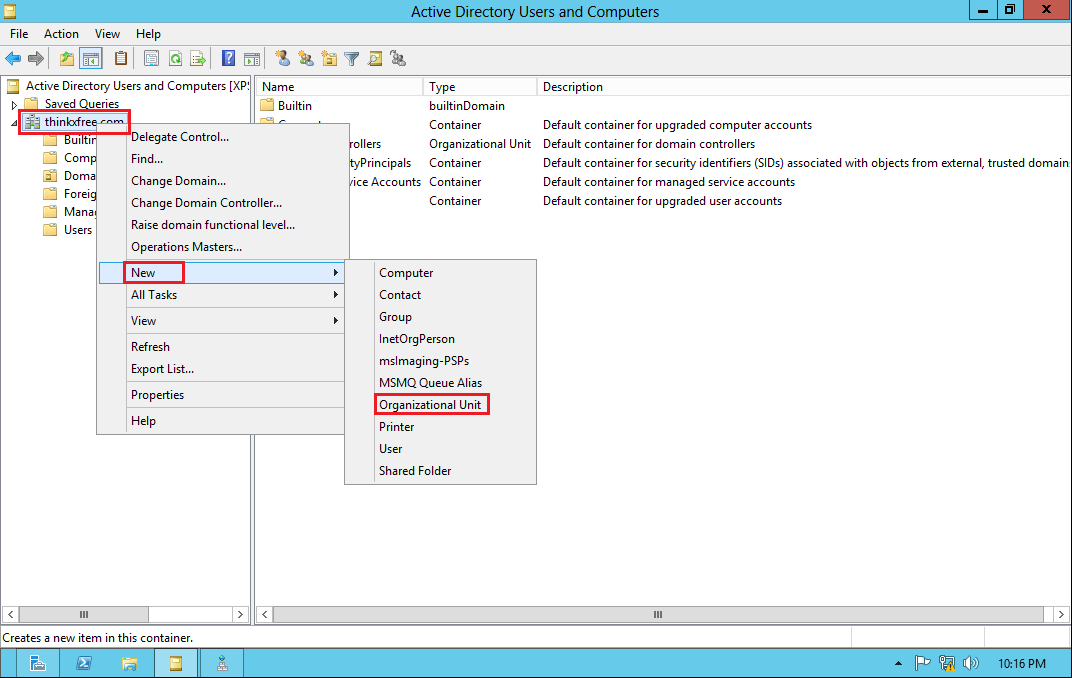
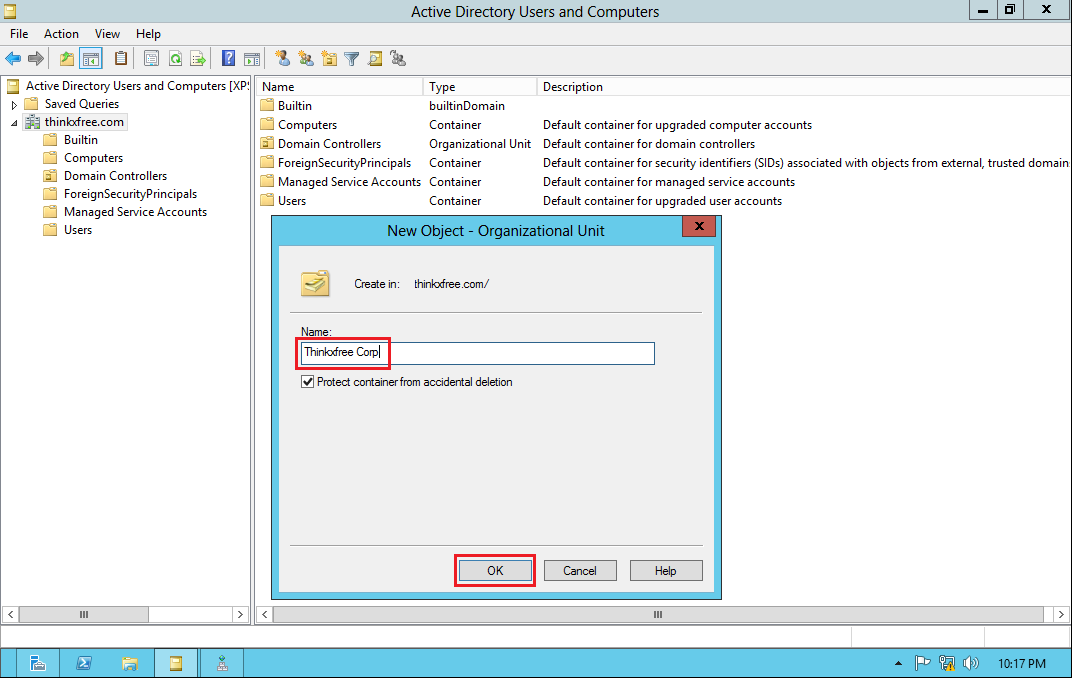
23. Selanjutnya pada nama Domain thinkxfree.com kita klik kanan lalu membuatOrganization Unit sesuai kebutuhan kita. Misalnya seperti yang tampak pada gambar dibawah ini. Jika anda masih Newbie dalam Windows Server Domain Controller, ada baiknya anda membaca artikel ini lebih dulu :
https://thinkxfree.wordpress.com/2011/01/09/step-by-step-installasi-active-directory-windows-server-2003-bag-3-konfigurasi-gpo/
# dan :
https://thinkxfree.wordpress.com/2011/01/09/step-by-step-installasi-active-directory-windows-server-2003-bag-4-konfigurasi-user-domain/


Install-Active-Directory-Win2012-DC-Server-023
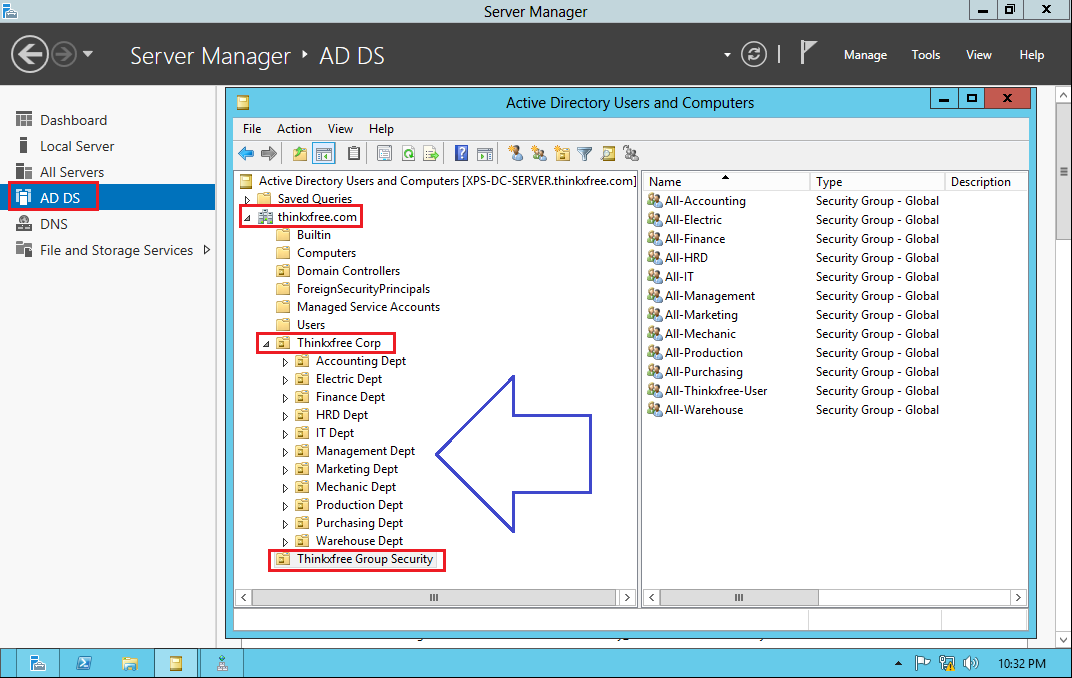
24. Masing-masing Administrator Server punya Style atau gaya sendiri-sendiri dalam melakukan konfigurasi atau mendesain Topologi User Manajemen pada AD DS. Ada yang rapi dan detail, ada juga yang simple dan praktis. Semuanya terserah anda…
Install-Active-Directory-Win2012-DC-Server-024
25. Selain membuat Group Departemen dalam Domain Server, kita juga harus membuatUser Group Security seperti pada gambar dibawah ini. Tujuan pembuatan group OU ini adalah agar memudahkan kita dalam melakukan maintenance atau memanage AD DS server kita ini.
Install-Active-Directory-Win2012-DC-Server-025
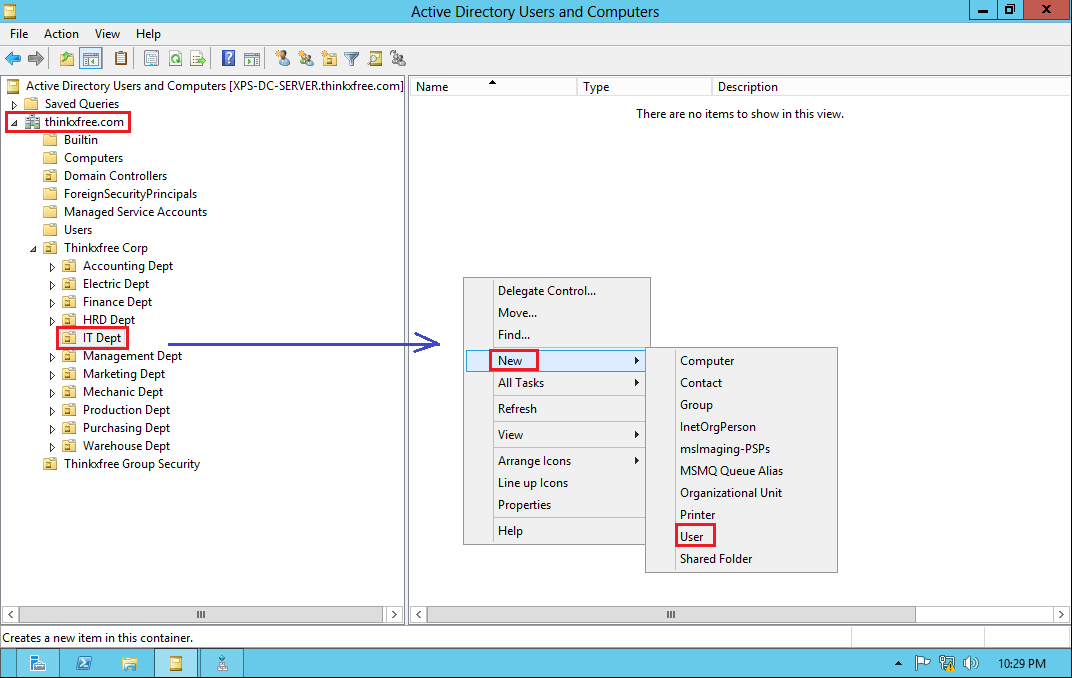
26. Selanjutnya pada setiap Departemen / setiap bagian, kita buat sejumlah user sesuai kebutuhan implementasi dan jumlah user kita.
Install-Active-Directory-Win2012-DC-Server-026
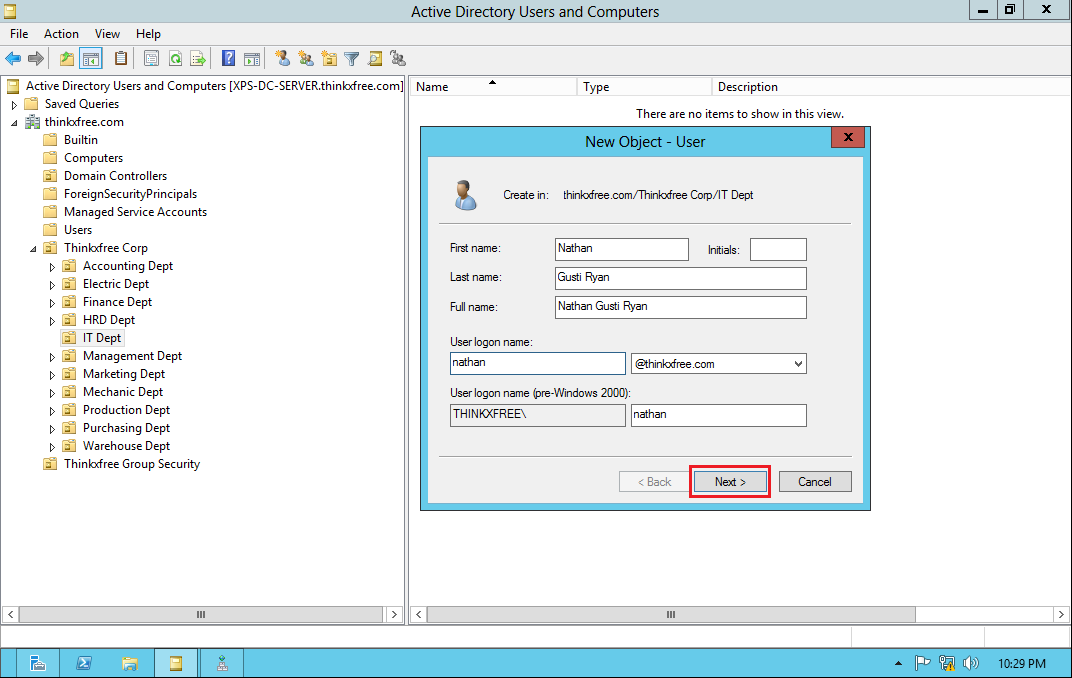
27. Buatlah nama user seperti contoh dibawah ini :
Install-Active-Directory-Win2012-DC-Server-027
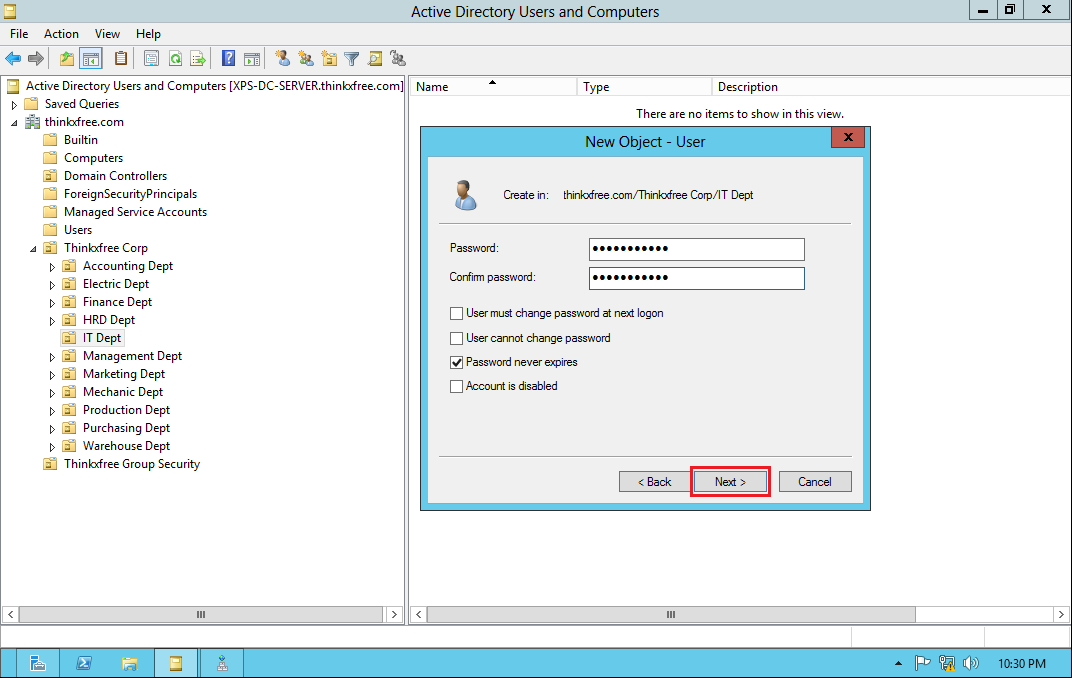
28. Serta memberikan password bagi user. Satu hal yang harus di catat adalah pada konfigurasi User Domain Server ini Administrator hanya bisa membuatkan password atau me-reset password user, namun Administrator tidak dapat mengetahui apa password user tersebut setelah password diganti oleh masing-masing user.
Install-Active-Directory-Win2012-DC-Server-028
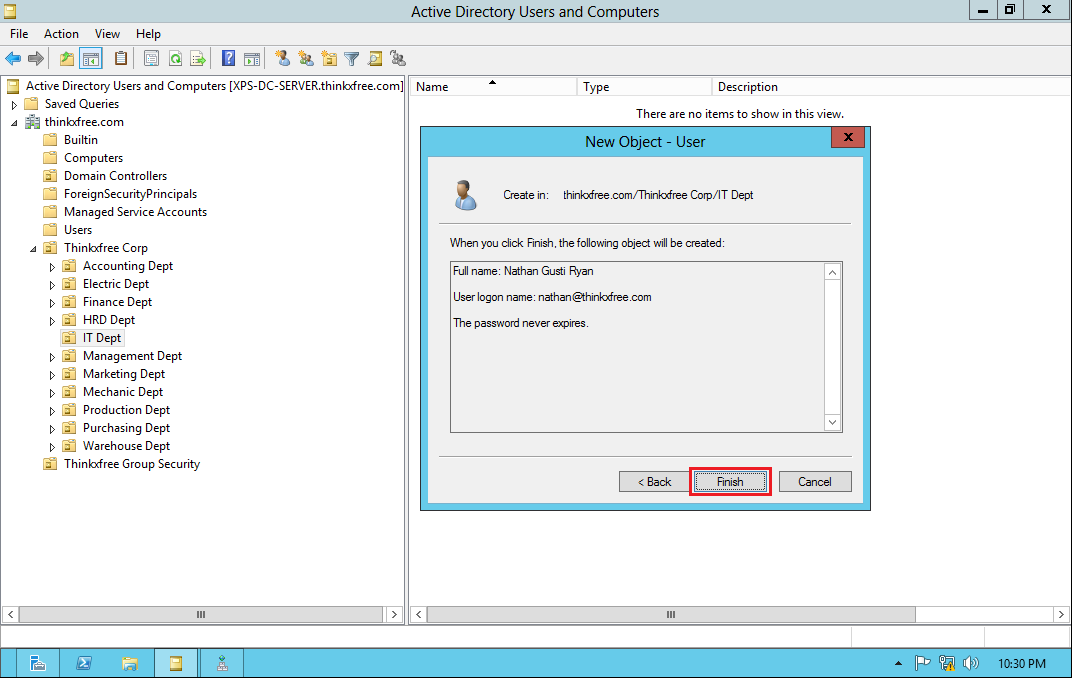
29. Selanjutnya kita klik Finish.
Install-Active-Directory-Win2012-DC-Server-029
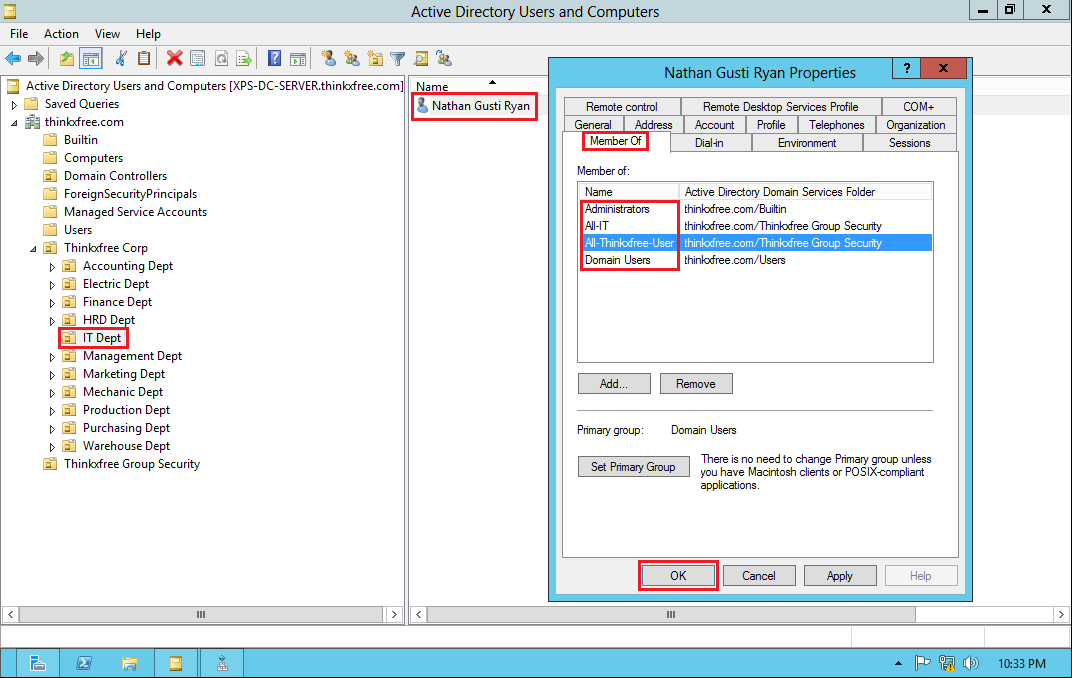
30. Setelah Account User kita Create, maka selanjutnya kita tinggal tambahkan Group Security ( sesuai Job dan departemen / bagian kerja-nya ) maupun kita bisa menambahkan fitur Login Script pada konfigurasi user ini.
Install-Active-Directory-Win2012-DC-Server-030
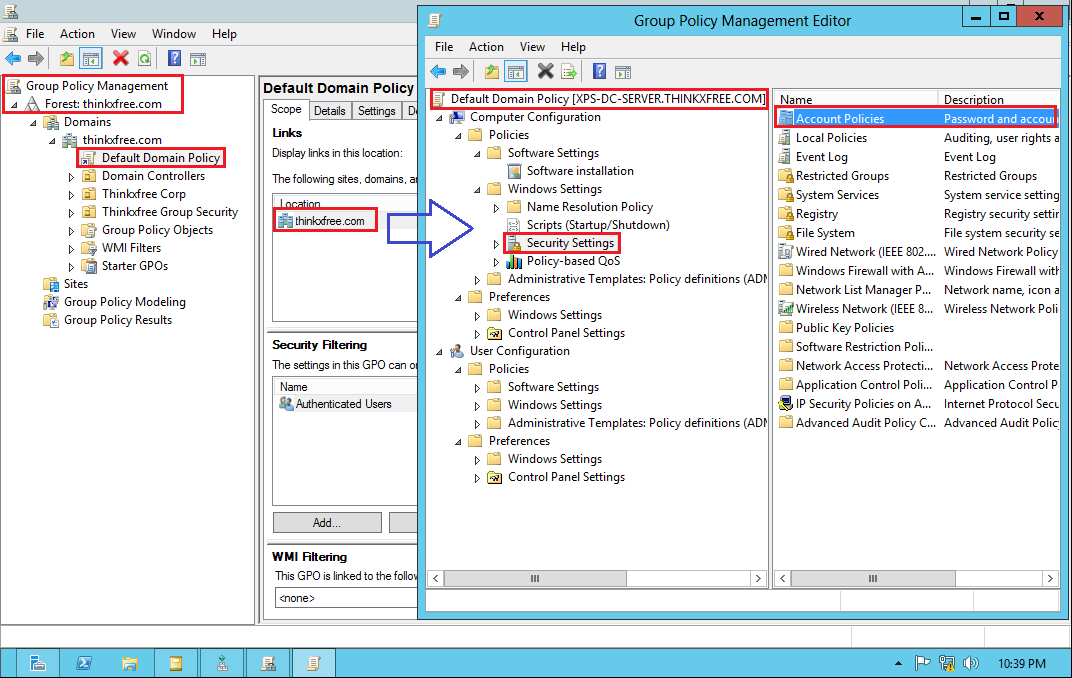
31. Setelah selesai pembuatan User, kita klik menu utama atau Symbol Windows pada keyboard kita. Pada tampilan menu Desktop kita ada berbagai menu untuk konfigurasi server (Administratif Tools ), diantaranya adalah menu Group Policy Management.
Install-Active-Directory-Win2012-DC-Server-031
32. Pada menu Group Policy Management ini diantaranya kita bisa mengatur User Policy Management.
Install-Active-Directory-Win2012-DC-Server-032
Okey… mudah sekali bukan??? Selamat mencoba… Salam
https://thinkxfree.wordpress.com/2014/03/25/step-by-step-installasi-windows-server-2012-dan-active-directory-atau-domain-controller-server-bagian-2-ad-domain-services-configuration/