


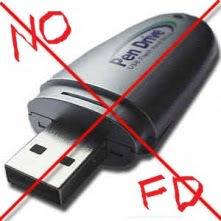
Tips Memblokir Perangkat USB Yang Masuk ke Komputer All Windows :)
http://mbedhian.blogspot.com/2011/03/tips-memblokir-perangkat-usb-yang-masuk.html
Sebuah data penting yang ada di komputer maupun laptop kita, merupakan hak kita untuk menggunakan atau membagikannya, karna data tersebut butuh ijin dari kita yang memiliki. Namun sering kali karna kelalaian kita, data tersebut bisa di ambil dengan mudah oleh orang yang tidak bertanggung jawab, dengan kata lain, orang tersebut bisa mengambil atau menyalin data-data penting yang kita miliki dengan suatu perangkat USB (Flashdisk, memory card, mmc,dsb). Untuk mengatasi hal ini, kita harus memblokir device-device yang digunakan untuk sambungan perangkat USB tersebut. Nah bagaimana caranya memblokir USB??? Disini saya akan membahasnya dengan berbagai cara di windows apapun, Oke kan dah gak usah kebanyakan omong langsung aja yah…
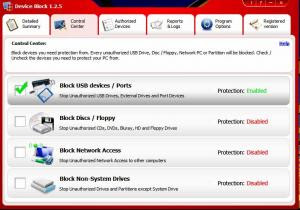
===Win XP/7: Dgn Software Device Block 1.2.5===
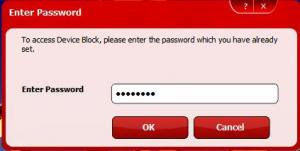
Salah satu tools yang terkenal ampuhnya menurut saya yaitu dengan menggunakan Device Block v1.2.5. Software ini bukan hanya dapat memblokir suatu perangkap USB port, namun juga bisa memblokir network PC’s drive (bluetooth), Disc/Floopy device yang ingin dimasukan di drive, dan tentunya sistem partitions. Jika suatu perangkat masuk ke laptop kita dan tanpa ijin dari kita, maka software ini akan muncul dan meminta sebuah password yang sudah kita atur sebelumnya. Namun ini juga bisa di atur pada pengaturannya sehingga software tidak lagi memunculkan kotak dialog password untuk di masukan dan orang lain tidak tahu jika kita menginstal software ini.
Download Device Block v1.2.5 Full Version
NB: Setelah beberapa kali pemeriksaan ternyata software ini cukup memakan memory yang banyak. Jadi untuk menggunakan program ini harus mempunyai minimal RAM 512MB
===Windows XP: Dengan registry Editor===
Demi keamanan, Anda bisa mencegah komputer menyimpan data ke USB drive, caranya :
1. Klik Start lalu pilih Run. Ketik “regedit” (tanpa tanda kutip) lalu klik OK.
2. Cari alamat HKEY_LOCAL_MACHINE\SYSTEM\CurrentControlSet\Control.
3. Pada panel kanan, klik kanan dan buat kunci baru (New Key) dengan nama “StorageDevicePolicies”.
4. Pada panel kiri, pilih StorageDevicPolicies yang baru dibuat tadi. Buat DWORD value baru dan beri nama “WriteProtect”.
5. Ubah nilai value menjadi “1”. Tutup Editor lalu restart komputer.
Catatan :
Untuk mengembalikan seperti semula sobat tinggal mengganti Value Data dari key “WriteProtect” menjadi 0, untuk mengaktifkan kembali Blokir USB masukan 1
anda tetap dapat copy paste file dari flashdisk ataupun handphone ke komputer anda, tetapi tidak sebaliknya.
===Windows 7: Dengan Group Poliy Editor===
Agar Removeable Storage device tidak dapat di akses pada windows 7, anda bisa mengaturnya melalui group policy editor.
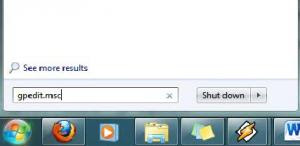
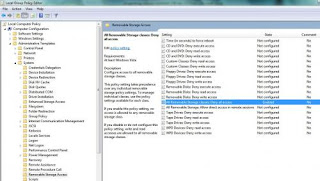
1. Buka group policy editor, pada run command – tulis perintah gpedit.msc
2. Masuk ke Computer configuration/ Administrative Templates/ System/ Removable Storage Access
3. Jadikan enable untuk konfigurasi ‘All Removable Storage Classes:All access deny’
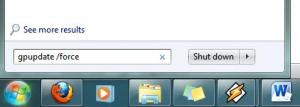
4. Masukkan perintah ‘ gpupdate /force ‘ pada search programs and files untuk meng-apply perubahan pada group policy atau log off computer dan login kembal
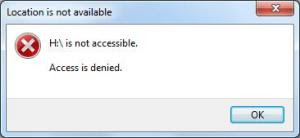
5. Jika berhasil, anda tidak mempunyai akses terhadap usb driv
Nah udah semua kan Mudah banget vara2 di ats tinggal dipraktekin aja biar buat kompi kita semakin save g bisa diusilin ma orang2 J skian dulu… Oh Yaw kalo da kesulitan silahkan melayangkan pertanyaannya di kolom komentar,,… G Usah malu ntar kata pepatan sesat di jalan

===Win XP/7: Dgn Software Device Block 1.2.5===
Salah satu tools yang terkenal ampuhnya menurut saya yaitu dengan menggunakan Device Block v1.2.5. Software ini bukan hanya dapat memblokir suatu perangkap USB port, namun juga bisa memblokir network PC’s drive (bluetooth), Disc/Floopy device yang ingin dimasukan di drive, dan tentunya sistem partitions. Jika suatu perangkat masuk ke laptop kita dan tanpa ijin dari kita, maka software ini akan muncul dan meminta sebuah password yang sudah kita atur sebelumnya. Namun ini juga bisa di atur pada pengaturannya sehingga software tidak lagi memunculkan kotak dialog password untuk di masukan dan orang lain tidak tahu jika kita menginstal software ini.


Download Device Block v1.2.5 Full Version
NB: Setelah beberapa kali pemeriksaan ternyata software ini cukup memakan memory yang banyak. Jadi untuk menggunakan program ini harus mempunyai minimal RAM 512MB
===Windows XP: Dengan registry Editor===
Demi keamanan, Anda bisa mencegah komputer menyimpan data ke USB drive, caranya :
1. Klik Start lalu pilih Run. Ketik “regedit” (tanpa tanda kutip) lalu klik OK.
2. Cari alamat HKEY_LOCAL_MACHINE\SYSTEM\CurrentControlSet\Control.
3. Pada panel kanan, klik kanan dan buat kunci baru (New Key) dengan nama “StorageDevicePolicies”.
4. Pada panel kiri, pilih StorageDevicPolicies yang baru dibuat tadi. Buat DWORD value baru dan beri nama “WriteProtect”.
5. Ubah nilai value menjadi “1”. Tutup Editor lalu restart komputer.
Catatan :
Untuk mengembalikan seperti semula sobat tinggal mengganti Value Data dari key “WriteProtect” menjadi 0, untuk mengaktifkan kembali Blokir USB masukan 1
anda tetap dapat copy paste file dari flashdisk ataupun handphone ke komputer anda, tetapi tidak sebaliknya.
===Windows 7: Dengan Group Poliy Editor===
Agar Removeable Storage device tidak dapat di akses pada windows 7, anda bisa mengaturnya melalui group policy editor.
1. Buka group policy editor, pada run command – tulis perintah gpedit.msc

2. Masuk ke Computer configuration/ Administrative Templates/ System/ Removable Storage Access
3. Jadikan enable untuk konfigurasi ‘All Removable Storage Classes:All access deny’

4. Masukkan perintah ‘ gpupdate /force ‘ pada search programs and files untuk meng-apply perubahan pada group policy atau log off computer dan login kembal

5. Jika berhasil, anda tidak mempunyai akses terhadap usb driv

Nah udah semua kan Mudah banget vara2 di ats tinggal dipraktekin aja biar buat kompi kita semakin save g bisa diusilin ma orang2 J skian dulu… Oh Yaw kalo da kesulitan silahkan melayangkan pertanyaannya di kolom komentar,,… G Usah malu ntar kata pepatan sesat di jalan
Memblok USB Flashdisk pada komputer
Sejak menggantikan Floppy Disk sebagai media tempat melakukan pertukaran file secara offline, USB Flashdisk secara otomatis berperan juga sebagai media penyebaran virus yang paling efektif saat ini.
Untuk membatasi penyebaran virus lewat media USB Flashdisk ini ada beberapa cara yang bisa kita lakukan, diantaranya yaitu dengan menambahkan file atau folder autorun.inf yang tidak bisa diedit misalnya dengan menggunakan Antivirus Smadav atau dengan menggunakan aplikasi USBVaccine.
 Untuk keperluan tertentu misalnya diwarnet atau kantor yang telah menggunakan jaringan LAN sebagai media transfer data, seringkali penggunaan USB Flashdisk pada beberapa komputer perlu ditutup sama sekali, sehingga penyebaran virus melalui media USB Mass Storage Devices ini bisa ditekan seminimal mungkin.
Dalam artikel ini saya akan berbagi informasi tentang cara memblok penggunaan USB Flashdisk pada komputer secara total sehingga tidak bisa digunakan sama sekali. Berikut beberapa metoda yang dapat kita lakukan.
1. Mendisable / blok USB Flashdisk atau USB Storage Device pada Komputer dengan memanfaatkan registry Windows.
Untuk membatasi penyebaran virus lewat media USB Flashdisk ini ada beberapa cara yang bisa kita lakukan, diantaranya yaitu dengan menambahkan file atau folder autorun.inf yang tidak bisa diedit misalnya dengan menggunakan Antivirus Smadav atau dengan menggunakan aplikasi USBVaccine.
Dalam artikel ini saya akan berbagi informasi tentang cara memblok penggunaan USB Flashdisk pada komputer secara total sehingga tidak bisa digunakan sama sekali. Berikut beberapa metoda yang dapat kita lakukan.
1. Mendisable / blok USB Flashdisk atau USB Storage Device pada Komputer dengan memanfaatkan registry Windows.
- Login ke komputer dengan Account Administrator
- Masuk ke Registry Editor, dengan cara klik Start - Run ketik: regedit
- Carilah Key USBSTOR yang berlokasi di:HKEY_LOCAL_MACHINE\SYSTEM\CurrentControlSet\Services\USBSTOR
- Double klik pada Start value yang berada di jendela sebelah kanan, dan ganti nilainya dari 3 menjadi 4.Sampai disini kita sudah bisa mendisable penggunaan USB Mass Storage Device.

- Untuk menambah sekuritas sehingga Key tersebut tidak bisa dimodifikasi sembarangan, lakukan setting permission pada key USBSTOR tersebut untuk semua Account pada komputer tersebut kecuali account Administrator menjadi "Deny", caranya:
- klik kanan pada Key USBSTOR
- klik Permission, sehingga tampil jendela Permission for USBSTOR
- kemudian untuk masing-masing Permission Group atau user names, berikan tanda check pada bagian Deny

- klik Apply dan OK
- Tutup jendela Registry Editor dan restart komputer.
2. Mendisable / blok USB Flashdisk atau USB Storage Device pada Komputer dengan menggunakan aplikasi DisableUSB_Free.
Selain melalui edit registry untuk memblok USB Flashdisk seperti cara tersebut diatas, kita juga bisa memanfaatkan beberapa program seperti misalnya DisableUSB_Free
Selain melalui edit registry untuk memblok USB Flashdisk seperti cara tersebut diatas, kita juga bisa memanfaatkan beberapa program seperti misalnya DisableUSB_Free

Download USB Disabler di hxxp://www.intelliadmin.com/DisableUSB_Free.exe
http://www.catatanteknisi.com/2010/12/memblok-usb-flashdisk-pada-komputer.html
How To Take Full Permissions Control To Edit Protected Registry Keys
 The Windows registry is a hassle to edit under normal circumstances, but sometimes you’ll encounter keys that are protected by the system. When you try to edit a protected registry key you’ll run into a few different errors, but they generally tell you that you lack permissions for making changes. But, since it is just a permissions issue we can get around this by granting your user account in Windows the correct permissions! Read on to learn how…
How do I know the registry key is protected?
When trying to create a new entry within a protected Key you’ll see the following error:
Error Creating KeyCannot create key: You do not have the requisite permissions to create a new key under <registry key name>.

When you try to edit a entry, you’ll see this error:
Error Editing Value:Cannot edit <entryname>: Error writing the value’s new contents.


When you are working with a premade .reg file, it won’t work. If you run a .reg file to import new registry entries, you’ll encounter the following error:
Registry EditorCannot import <folder\file.reg> Not all data was successfully written to the registry. Some keys are open by the system or other processes.

How To Take Ownership & Full Control Of The Registry
If you are encountering the above errors, without a doubt you’ve encountered a protected registry key. Normally these keys are only open to modification by the System, but if you follow the steps below you’ll learn how to make your user account a poweful registry editing demi-god. Open up regedit and let’s get started!
Step 1
In regedit (Registry Editor) Right-Click the protected key in question. From the context menu that appears, Select Permissions…
Tip: If you want, you could take control of the top tree of the registry. In effect you would have full control of the entire registry, however this is not recommended for security purposes unless you plan on removing said permissions when you finish working.

Step 2
In the Permissions window that appears, Click Advanced.

Step 3
Click the Owner tab and Select your username from the list.* Now Check the Replace ownerbox and Click Apply. (Yes! This is one of the few instances where the Apply button is actually useful!)
*If your username is not on this list Click Other users or groups… and manually add it.

Step 4
Click the Permissions tab and then the Add… button. In the Select User window Type yourusername into the white box and Press OK.

Step 5
A new Permission Entry window should pop-up, just Check the Allow Full Control box andClick OK.

Step 6
Back on the previous window your username should be on the list with Permissions set to FullControl. Now all that is left to do is to save and exit all open windows by Clicking OK a couple times.

Done!
You should now be able to edit any of the entries within the registry key that you just modified permissions for. Don’t forget that if you want maintain proper security protocol, after you are done you can go back in and Remove your user from the list of names with Full Control. Have a groovy time editing the registry without restriction!
0 komentar:
Posting Komentar