Windows 8 Pro (as well as all previous Windows client OS version) allows only one concurrent user session. This means you can't connect viaRemote Desktop if local user is already logged on. Normally it's not a problem on a client machine, but in some cases you may want ability to login concurrently. A good example is a Media Centre PC when somebody watches a movie and you want to access the machine without interrupting the movie.
To have multiple RDP sessions working your need to make some modifications to the termsrv.dll file. There are tools that do these changes automatically, but they often come from dubious sources and it's difficult to be sure that they are completely safe. This article shows how to modify termsrv.dll file yourself.
termsrv.dll file is normally located in C:\Windows\System32 folder. Before modifying this file for the first time, you need to take ownership and assign yourself read/write permissions. You also need to stop Remote Desktop service (TermService).
Once this is done, it's simply a question of opening termsrv.dll with a HEX editor and changing small part of the file. Always backup the original file before making changes.
Certain Windows updates can replace your patched version of termsrv.dll. This doesn't happen very often, but if you let Windows update automatically, be prepared to loose multiple RDP sessions at any time.
Windows 8.1 (64bit)
In original version of Windows 8.1 (64bit), you need to replace:
8B 81 38 06 00 00 39 81 3C 06 00 00 0F 84 1B 70 00 00
with
B8 00 01 00 00 89 81 38 06 00 00 90 90 90 90 90 90 90
Here are the patched bits:
Readily patched version can be download from
here.
If something goes wrong and you want to revert, original unpatched termsrv.dll v6.3.9600.16384 can be downloaded from
here.
Note: This was tested and works with Windows 8.1 Pro RTM 64bit.
July 2014 update for Windows 8.1 (64bit)
One of the Windows updates installed on 9th of July updated termsrv.dll file from version 6.3.9600.16384 to 6.3.9600.17095. File size also changed from 1,032,704 bytes to 1,018,880 bytes. This naturally broke the previous termsrv.dll patch.
To restore concurrent RDP sessions, use any HEX editor and replace:
39 81 3C 06 00 00 0F 84 9E 31 05 00
with
B8 00 01 00 00 89 81 38 06 00 00 90
Or just download a patched version from
here. You will need to stop Remote Desktop services and possibly take ownership of
termsrv.dll before you can update it.
Original unpatched v6.3.9600.17095 can be downloaded from
here.
Note: This was tested and works with Windows 8.1 Pro RTM 64bit.
November 2014 update for Windows 8.1
(64bit)
Windows updates now updated termsrv.dll file from version 6.3.9600.17095 to 6.3.9600.17415. File size changed from 1,018,880 bytes bytes to 1,114,624 bytes.
To restore concurrent RDP sessions, use any HEX editor and replace:
39 81 3C 06 00 00 0F 84 D3 1E 02 00
with
B8 00 01 00 00 89 81 38 06 00 00 90
You can download a patched version from
here. You will need to stop Remote Desktop services and possibly take ownership of
termsrv.dll before you can update it.
Original unpatched v6.3.9600.17415 can be downloaded from
here.
(32bit)
I don't have any 32bit machines and haven't tested this myself, but guys on
mydigitallife forums suggest to replace:
3B 81 20 03 00 00 0F 84 2A D5 00 00
with
B8 00 01 00 00 89 81 20 03 00 00 90
How To Allow Multiple Concurrent Users Log In Windows 8 through Remote Desktop
Note: new updated info on Windows 8.1 at the bottom of this post. Check it out.
Here is what you get if you are trying to log 2 or more accounts into one Windows 8 machine at the same time:
Another user is signed in. If you continue, they will be disconnected.
Basically, it’s telling you that you can switch users while still keeping all users’ data alive but you can only access one user account at any given time.
But here is a tweaking tool that can alter this setting to literally allow unlimited concurrent user access, through remote desktop connection.
Warning: before you do the patch, create a system restore point or back up termsrv.dll file in c:\windows\system32 folder, just in case something goes wrong along the way.
Once you’ve done the backup, go to
this webpage and download “Windows 8 Patcher.exe” file from there.
Note that the patcher is no longer working on Windows 8.1. Go to the bottom of the page to check the updates how to get Windows 8.1 patched up with multi-current RDP sessions.
Save all your work, and double-click the file to launch the patcher, which applies the patch to the termsrv.dll file and automatically restarts your computer in 8 seconds.
All done and ready to rock after the reboot. A fairly simple and painless process.
Now, let’s test. I fired up my laptop and launched RDP client twice and was able to connect to this patched Windows 8 computer with two different user accounts I previously set up. It works like a charm.
So what kind of magic this patcher did to make this happen? Basically, it did two things, one to patch the termsrv.dll to allow multi-concurrent users to log in, and one to make two registry changes to allow the TS connection in.
HKLM\System\CurrentControlSet\Control\Terminal Server\
fDenyTSConnections (DWORD) = 0
fSingleSessionPerUser (DWORD) = 0
And that’s it and enjoy.
/updated on Nov. 12, 2014/
The above method works fine in Windows 8 but not in Windows 8.1. If you are on Windows 8.1 and would like to do the same, follow the following steps.
1. Download the zipped
patch file (direct download link) that includes both original and patched version of
termsrv.dll file for both 32-bit and 64-bit editions.
2. Stop Remote Desktop Services service from Services MMC console.
3. Replace the ownership of the termsrv.dll file in Windows\System32 folder with a user account that has local admin privilege. And give that user a full control permission on termsrv.dll file.
4. Make a copy of original termsrv.dll file and overwrite it with one from zipped patch file downloaded on step 1.
5. Restart Remote Desktop Services or reboot your computer.
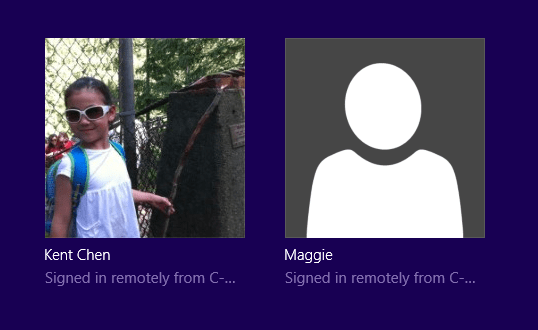
Now let’s try it again. I fired up the patched Windows 8 and logged in through RDP client using two different user accounts. On the console, you will see something like this that shows two different user accounts simultaneously signed on at the same time.
If you are looking for doing the same thing on Windows 7 or Windows 10 computers, check out the following posts.
Update May 2015
As of 05.2015, the same November 2014 patch is still working on up to date Windows 8.1. termsrv.dll is still on version 6.3.9600.17415.
https://www.youtube.com/watch?v=P9WaaiotiVU
http://www.nextofwindows.com/how-to-allow-multiple-concurrent-users-log-in-windows-8-through-remote-desktophttp://www.mysysadmintips.com/windows/clients/345-multiple-rdp-remote-desktop-sessions-on-windows-8


Poskan Komentar
hampir semua postingan ini merupakan hasil copy paste dari blog lain. namun kami sertakan link rujukan asli tulisan tersebut. jika ada yang keberatan mohon konfirmasinya. kami akan segera menghapus postingan tersebut