Senin, 27 Februari 2017

Cara Menggunakan HD Tune Pro 5.50 Pada Hardisk Bad Sector

Langsung saja..
Pada kesempatan kali ini saya cuma membahas mengenai cara menggunakan HD Tune Pro 5.50 yang berhubungan dengan hardisk WDC 2TB GREEN kemaren yang saya perbaiki yaitu tidak terdeteksi sama sekali disebabkan banyaknya sector yang sudah jelek atau biasa dikenal "Bad Sector" dan cuma mengetahui apa hardisk yang saya betulkan kemaren masih ada sisa bad sectornya atau tidak. Setelah melalui proses HDD low level format, terakhir saya menggunakan software "HD Tune Pro 5.50". Langsung saja kita lihat tampilan pertama pada software ini


Setelah tampilan awal muncul kemudian klik "error scan" seperti gambar dibawah ini


Kemudian tentukan hardisk mana yang akan kita scan. Lihat gambar dibawah ini


Setelah kita memilih hardisk klik "Start" untuk memulai proses scan. Untuk lebih optimal guna mengetahui masih ada badsector atau tidak sebaiknya pada pilihan "Quick Scan" jangan dicentrang, tapi membutuhkan waktu yang lumayan lama hehe.


Pada proses diatas kotak hijau mengartikan bahwa hardisk baik-baik saja dan kotak merah berarti masih ada sisa bad sector biarkan proses berjalan sampai kotak hitam terisi semua. ini memakan waktu yang agak lama tergantung dari kapasitas hardisk dan banyaknya bad sector pada hardisk. Setelah kotak sudah terisi semua kita bisa melihat keadaan hardisk seperti gambar dibawah ini 


Gambar diatas merupakan hasil scan yang telah dilakukan. Selesai..
Selamat mencoba

http://cobamotor.blogspot.co.id/2015/05/cara-menggunakan-hd-tune-pro-550-pada.html
.. https://www.shutterstock.com/download/success?src=Vi3S-0xV-qbOQpjFZhbiig-1-20 ..
..
https://www.youtube.com/watch?v=p97Yg7u8fSk

FreeNAS® 8.0.1: iSCSI In-depth

Minggu, 26 Februari 2017

22Jul


 Simulasi Routing VLAN antar Gedung    


Cara Install Cisco IOS Pada GNS3

Cara Install Cisco IOS Pada GNS3 – Pada artikel sebelumnya saya sudah membahasa tentang bagaimana cara menginstall mikrotik pada GNS3. kali ini saya akan membahas tentang bagaimana menginstall dan menjalankan cisco ios pada GNS3 simulator
Cisco IOS merupakan sistem operasi multitasking yang mengatur proses routing, switching internetworking dan fungsi telkomunikasi lainya yang ada dalam router cisco. sama dengan mikorik RouterOS cisco juga menciptakan berbagai jenis IOS image yang penggunakanya tergantung dengan model router dan fitur dalam IOS tersbut
Berikut beberapa cara yang harus anda lakukan dalam menginstall cisco ios pada virtual GNS3, pada contoh ini saya menggunakan IOS Image c3640-js-mz.124-25d.bin. ios ini support dengan router cisco serie c3600 anda dapat mendownloadnya disini
1) Langkah pertama yang harus anda lakukan pastikan anda sudah melakukan download Cisco IOS
2) Lakukan Regestrasi Image tersebut dengan cara klik menu Edit > Preference3) Kemudian Pilh IOS routers dan masukan Cisco IOS  yang sebelumnya sudah anda download
iso2
3) Langkah berikutnya anda dapat memberi nama router pada contoh ini saya memberi nama jenis router c3600
iso3
4) Kemudian anda dituntut untuk memilih berapa ukuran memori RAM yang akan digunakan
iso4
5) Kemudian anda juga dituntut untuk memilih berapa jumlah interface yang terpasang pada router cisco
iso5
6) Setelah selesai anda akan ditampilan dengan informasi lengkap router cisco yang baru saja anda tambahkan
iso6
7) Setelah IOS ditambahkan selanjutnya kita bisa mengsimulasikan router, dengan melakukan drag and drop kedalam halaman kerja GNS3
iso7
8) Kemudian lakukan klik start untuk menjalankan router, dan melakukan klik console untuk menjalankan terminal CLI (command line interface) pada cisco
iso1
Oke Sekian tutorial cara install cisco ios pada GNS3 selamat mencoba semoga bermanfaat :) 
http://omahjaringan.com/cara-install-cisco-ios-pada-gns3/:)

Kamis, 16 Februari 2017

iSCSI Configuration on Windows Server 2012 R2 part 5 of 33


https://www.youtube.com/watch?v=KFN26tx7RL8

Senin, 13 Februari 2017


 P 1102 printer fuser Teflon cover Replacement
https://www.youtube.com/watch?v=rRTD1IhZJqo

Memperbaiki windows server no booting /os eror


Fix Automatic Startup Repair Loop in Windows 10, 8 and 7

November 6th, 2015 by AdminLeave a reply »
A customer recently mentioned that his Windows 8 laptop was stuck in an Automatic Repair loop. When he turned on the computer, it came up with the ‘Preparing Automatic Repair’ screen, and then rebooted automatically and ran Automatic Repair again, becoming caught in the loop again and again.
There could be many reasons for a failed automatic repair. However, the most common problem is corrupted registry or missing files on the hard disk. Here I will give the complete solutions on how to fix this issue in Windows 10, 8 and 7.
All the solutions below require you to run certain commands at the Command Prompt. Here is a way to access the Command Prompt at boot:
  1. Insert your Windows installation DVD, turn on the computer, and wait until you see the message “Press any key to boot from CD or DVD“. Just press any key to continue. (Note: If you don’t see this message, you probably have to change the boot order in the BIOS)
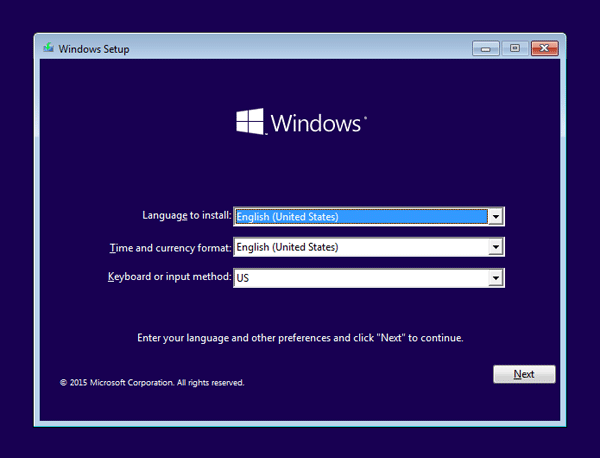
  2. After a while, you’ll get to the Windows Setup screen. Press Shift + F10 to open a Command Prompt.
    windows-setup
Solution 1: Running check disk to see if your hard drive is the problem
Chkdsk could be used to check and repair your hard drive for filesystem corruption. Before running the chkdsk command, you have to find out the drive letter of your system drive. Depending on how your system is setup, this could be either C: or D:.
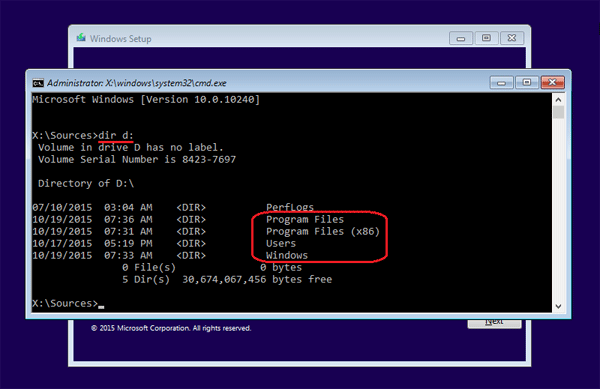
  1. Type dir C:\ and press Enter.
  2. If you see the common folders: Program Files, Users and Windows, then you have found your system drive.
    find-system-partition
    If the drive is not your system drive, repeat the step above, changing the drive letter to D, E or some other letter until the system drive is located.
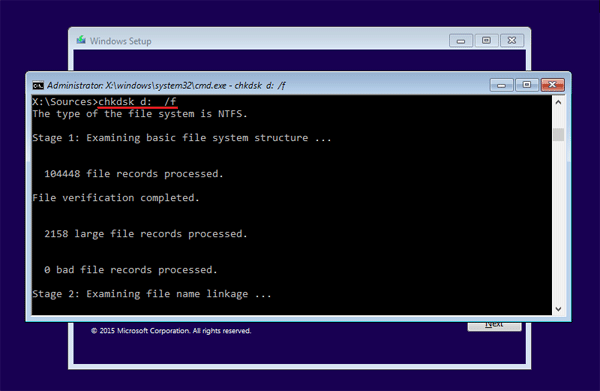
When you have located your Windows system drive, type the following command and press Enter. Replace d: with the actual drive letter of your system drive.
chkdsk d: /f
chkdsk
The scan should start. This could take several hours depending on the size of your hard drive. Once the scan is done, exit the Command Prompt and reboot your computer to check if the problem has been solved.
Solution 2: Manually attempt to rebuild the BCD and repair MBR
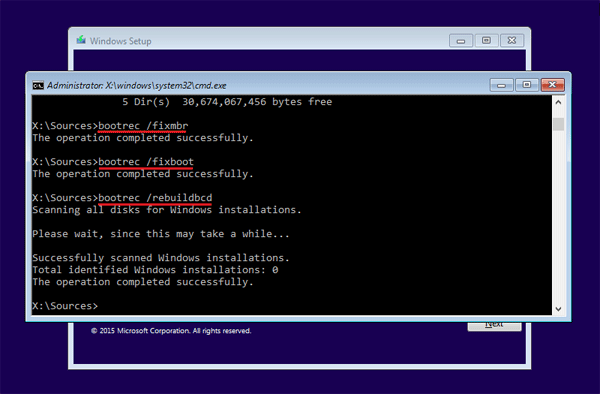
Running the bootrec utility to rebuild the BCD / MBR might fix the automatic repair loop problem. Type the following set of commands at the Command Prompt, one by one.
bootrec /fixmbr
bootrec /fixboot
bootrec /rebuildbcd
fix-mbr
The /fixmbr switch writes a new MBR (Master Boot Record) to the system partition, the /fixboot switch writes a new boot sector onto the system partition, and the /rebuildbcd switch scans all disks for Windows installations and provides a choice of which entries to add to the BCD store.
Solution 3: Disable Automatic Startup Repair
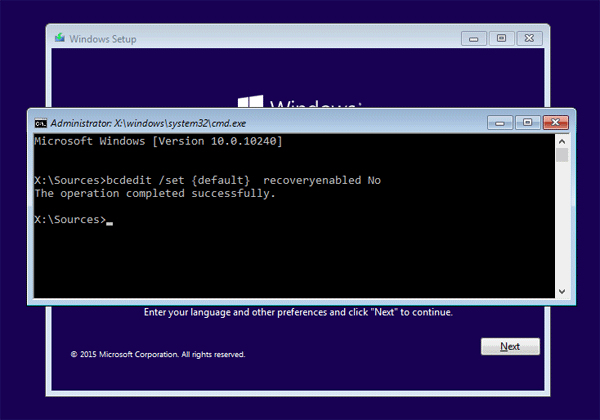
If the automatic repair couldn’t really repair your PC and just get you stuck in a repair loop, it’s better to disable the automatic startup repair. Type the following command and press Enter:
bcdedit /set {default} recoveryenabled No
disable-automatic-repair
Now you’ve successfully disabled the automatic startup repair feature in Windows.
Solution 4: Restore your Windows registry
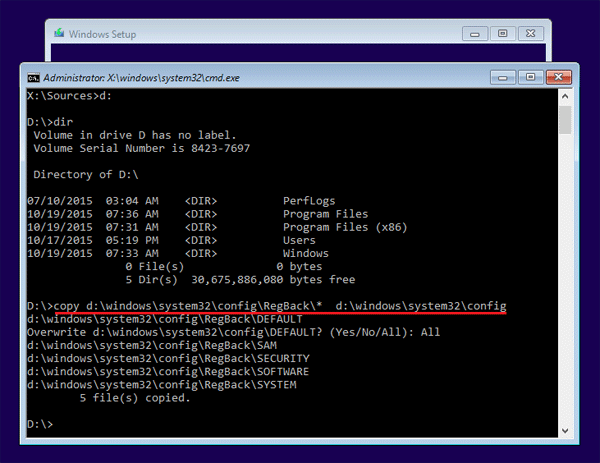
A corrupted registry settings can also cause a auto-repair loop. Here is how to restore your registry from the RegBack directory. The RegBack folder is located in :/windows/system32/config, which is used by Windows to hold a recent backup copy of the registry hives.
Assuming your system drive is d:, run the following command to restore Windows registry:
copy d:\windows\system32\config\RegBack\* d:\windows\system32\config
restore-windows-registry
if prompted to overwrite existing files, type All and hit Enter. Type exit and hit Enter to close the Command Prompt window. Restart your computer and most probably, you may able to access your Windows system as before.
http://www.top-password.com/blog/fix-automatic-startup-repair-loop-in-windows/