Minggu, 26 Februari 2017

Cara Install Cisco IOS Pada GNS3

Cara Install Cisco IOS Pada GNS3 – Pada artikel sebelumnya saya sudah membahasa tentang bagaimana cara menginstall mikrotik pada GNS3. kali ini saya akan membahas tentang bagaimana menginstall dan menjalankan cisco ios pada GNS3 simulator
Cisco IOS merupakan sistem operasi multitasking yang mengatur proses routing, switching internetworking dan fungsi telkomunikasi lainya yang ada dalam router cisco. sama dengan mikorik RouterOS cisco juga menciptakan berbagai jenis IOS image yang penggunakanya tergantung dengan model router dan fitur dalam IOS tersbut
Berikut beberapa cara yang harus anda lakukan dalam menginstall cisco ios pada virtual GNS3, pada contoh ini saya menggunakan IOS Image c3640-js-mz.124-25d.bin. ios ini support dengan router cisco serie c3600 anda dapat mendownloadnya disini
1) Langkah pertama yang harus anda lakukan pastikan anda sudah melakukan download Cisco IOS
2) Lakukan Regestrasi Image tersebut dengan cara klik menu Edit > Preference3) Kemudian Pilh IOS routers dan masukan Cisco IOS  yang sebelumnya sudah anda download
iso2
3) Langkah berikutnya anda dapat memberi nama router pada contoh ini saya memberi nama jenis router c3600
iso3
4) Kemudian anda dituntut untuk memilih berapa ukuran memori RAM yang akan digunakan
iso4
5) Kemudian anda juga dituntut untuk memilih berapa jumlah interface yang terpasang pada router cisco
iso5
6) Setelah selesai anda akan ditampilan dengan informasi lengkap router cisco yang baru saja anda tambahkan
iso6
7) Setelah IOS ditambahkan selanjutnya kita bisa mengsimulasikan router, dengan melakukan drag and drop kedalam halaman kerja GNS3
iso7
8) Kemudian lakukan klik start untuk menjalankan router, dan melakukan klik console untuk menjalankan terminal CLI (command line interface) pada cisco
iso1
Oke Sekian tutorial cara install cisco ios pada GNS3 selamat mencoba semoga bermanfaat :) 
http://omahjaringan.com/cara-install-cisco-ios-pada-gns3/:)

Kamis, 16 Februari 2017

iSCSI Configuration on Windows Server 2012 R2 part 5 of 33


https://www.youtube.com/watch?v=KFN26tx7RL8

Senin, 13 Februari 2017


 P 1102 printer fuser Teflon cover Replacement
https://www.youtube.com/watch?v=rRTD1IhZJqo

Memperbaiki windows server no booting /os eror


Fix Automatic Startup Repair Loop in Windows 10, 8 and 7

November 6th, 2015 by AdminLeave a reply »
A customer recently mentioned that his Windows 8 laptop was stuck in an Automatic Repair loop. When he turned on the computer, it came up with the ‘Preparing Automatic Repair’ screen, and then rebooted automatically and ran Automatic Repair again, becoming caught in the loop again and again.
There could be many reasons for a failed automatic repair. However, the most common problem is corrupted registry or missing files on the hard disk. Here I will give the complete solutions on how to fix this issue in Windows 10, 8 and 7.
All the solutions below require you to run certain commands at the Command Prompt. Here is a way to access the Command Prompt at boot:
  1. Insert your Windows installation DVD, turn on the computer, and wait until you see the message “Press any key to boot from CD or DVD“. Just press any key to continue. (Note: If you don’t see this message, you probably have to change the boot order in the BIOS)
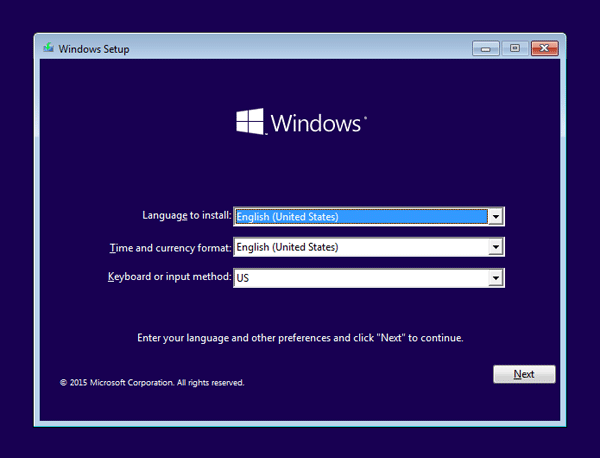
  2. After a while, you’ll get to the Windows Setup screen. Press Shift + F10 to open a Command Prompt.
    windows-setup
Solution 1: Running check disk to see if your hard drive is the problem
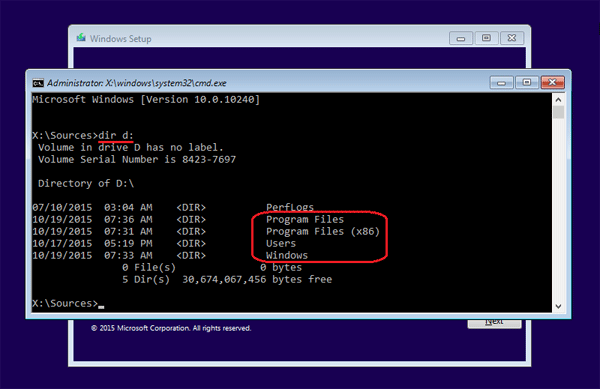
Chkdsk could be used to check and repair your hard drive for filesystem corruption. Before running the chkdsk command, you have to find out the drive letter of your system drive. Depending on how your system is setup, this could be either C: or D:.
  1. Type dir C:\ and press Enter.
  2. If you see the common folders: Program Files, Users and Windows, then you have found your system drive.
    find-system-partition
    If the drive is not your system drive, repeat the step above, changing the drive letter to D, E or some other letter until the system drive is located.
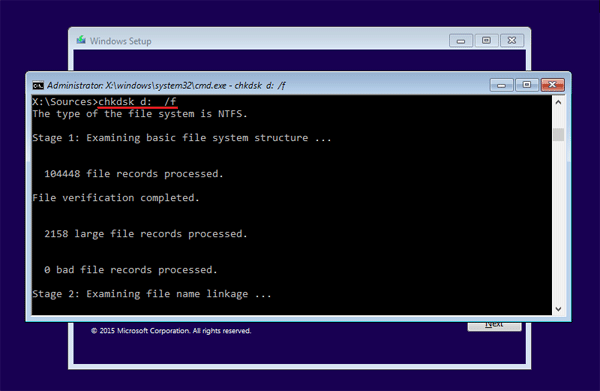
When you have located your Windows system drive, type the following command and press Enter. Replace d: with the actual drive letter of your system drive.
chkdsk d: /f
chkdsk
The scan should start. This could take several hours depending on the size of your hard drive. Once the scan is done, exit the Command Prompt and reboot your computer to check if the problem has been solved.
Solution 2: Manually attempt to rebuild the BCD and repair MBR
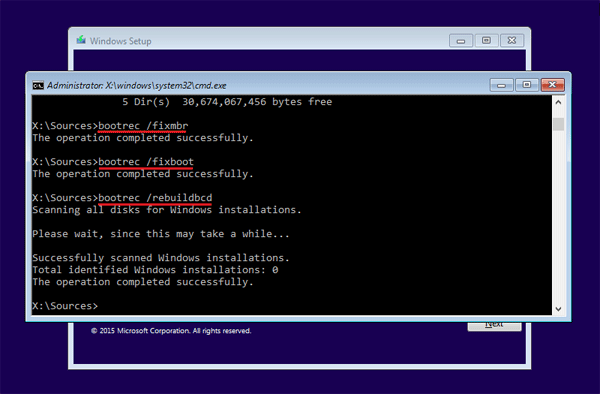
Running the bootrec utility to rebuild the BCD / MBR might fix the automatic repair loop problem. Type the following set of commands at the Command Prompt, one by one.
bootrec /fixmbr
bootrec /fixboot
bootrec /rebuildbcd
fix-mbr
The /fixmbr switch writes a new MBR (Master Boot Record) to the system partition, the /fixboot switch writes a new boot sector onto the system partition, and the /rebuildbcd switch scans all disks for Windows installations and provides a choice of which entries to add to the BCD store.
Solution 3: Disable Automatic Startup Repair
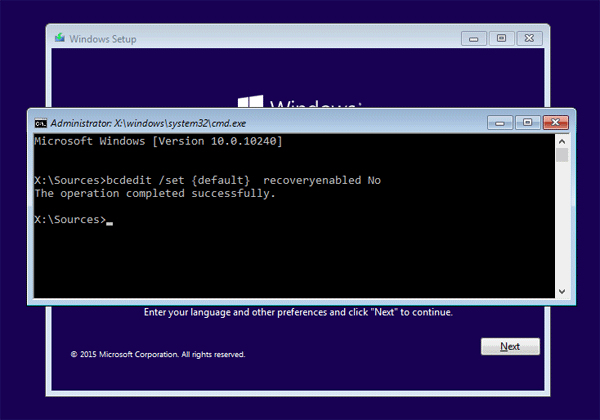
If the automatic repair couldn’t really repair your PC and just get you stuck in a repair loop, it’s better to disable the automatic startup repair. Type the following command and press Enter:
bcdedit /set {default} recoveryenabled No
disable-automatic-repair
Now you’ve successfully disabled the automatic startup repair feature in Windows.
Solution 4: Restore your Windows registry
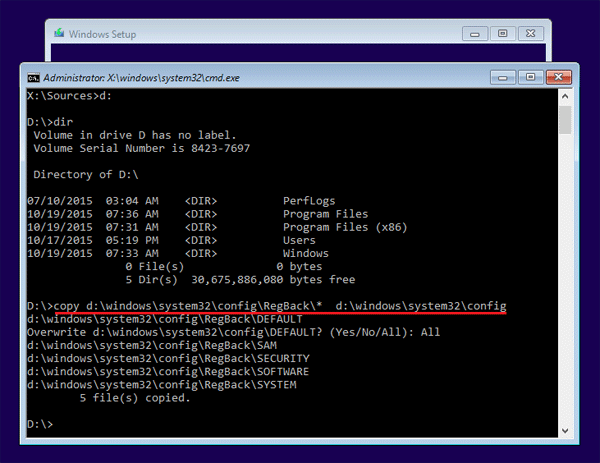
A corrupted registry settings can also cause a auto-repair loop. Here is how to restore your registry from the RegBack directory. The RegBack folder is located in :/windows/system32/config, which is used by Windows to hold a recent backup copy of the registry hives.
Assuming your system drive is d:, run the following command to restore Windows registry:
copy d:\windows\system32\config\RegBack\* d:\windows\system32\config
restore-windows-registry
if prompted to overwrite existing files, type All and hit Enter. Type exit and hit Enter to close the Command Prompt window. Restart your computer and most probably, you may able to access your Windows system as before.
http://www.top-password.com/blog/fix-automatic-startup-repair-loop-in-windows/

Senin, 23 Januari 2017

cmdkey /add:IP /user:administrator /pass:123
net use h: \\IP\NamaFolder \persistent:yes

 Make all future connections persistent (auto-reconnect at login)
 NET USE /Persistent:Yes
or 
 NET USE /P:Yes
CMDKEYPerintah cmdkey digunakan untuk menampilkan , membuat, dan menghapus user dan password disimpan
 run batch
Batch File

How To Create A Windows Batch File To Map Multiple Drives At Once

11
winlogo.jpgMapping a drive to a share on a remote computer can be a big time saver when you need to access files and folders remotely. UsingWindows Explorer, you can easily map the drive to the share on a remote computer when needed.
But what if you need to map multiple drives at once, or you want to always map the drive when you logon to your computer?
The best solution is to create a batch file that you can click on, when you need to map the drives, or copy it to your Windows user account Startup folder so the drives are mapped automatically during logon.
To map drives using a batch file, we'll need to use the net use command. At it's simplest form, the command looks like this:
net use [devicename | *] [\\computername\sharename
where:
devicename = the dive letter for the map drive
computername = is the computeer wher the share exists
sharename = is the name of the share
So to create a batch file that will map a drive to different computers that are sharing folders, we'll use the following commands:
net use W: \\computer1\MP3 
net use X: \\computer2\Photos
Note: you can asssign any drive letter you want, as long as it is not in use by your computer (for example A or drives).

What About Authentication?
Using the commands above to map drives, assumes that the account you are logged on as, exists on the remote computer where the shared folder is located, or if you are at work, is part of a Windows Domain.
If you need to authenticate when mapping the drive, we'll need to use an account that exists on the remote computer or in a Windows Domain, and add it onto the net use command as shown below:
net use [devicename | *] [\\computername\sharename password  /USER:username
Therefore the command will look like this when used in a batch file:
net use W: \\computer1\MP3 mypassword /USER:mary
net use X: \\computer2\Photos mypassword /USER:bob
If an error occurs (unknown user name), you will need to use the /USER switch with thedomainname option as follows:
net use W: \\computer1\MP3 mypassword /USER:mydomain\mary
If the remote computer is not part of a Domain, and is part of a Workgroup, then substitute the Domain for the name of the remote computer (where the user account resides).
net use W: \\computer1\MP3 mypassword /USER:computer1\mary

Creating The Batch File
Ok, now that we know how to use the net use command, let's create the batch file.
  • First, open up Notepad or your favorite text editor.
  • Next, copy the commands as shown below and paste them into the file. Don't forget to modify the net usecommand with the drive letter you want to use, the name of the Computer and share you want to map a drive to, and password and account name (if needed).
ECHO Begin Mapping Drivesnet use W: \\computer1\MP3 mypassword /USER:mary 
net use X: \\computer2\Photos myrealpassword /USER:bob 

exit
  • Then save the file with any name and a .bat extension (make sure it's NOT saved using .txt as the file type extension), to a location where you can easily access it (such as your Desktop).
  • When you need to map the drive(s), just double click on it.
  • http://onunqisa.blogspot.co.id/2012_12_01_archive.html 
  • http://blog.guardrex.com/

Minggu, 22 Januari 2017

tidak bisa scan fotocopy

Configure SMB Security in Windows Server 2012

Posted on June 20, 2013 by Russell Smith in Security with 0 Comments

How do I configure SMB Security in Windows Server 2012?

Windows Server 2012 (and Windows 8) introduce a new version of the Server Message Block (SMB) protocol for transferring files across a network. One of the most interesting new features is the ability to encrypt files over the wire between two supported clients. SMB 2.1 in Windows Server 2008 R2 (and Windows 7) was able to sign SMB packets to prevent spoofing, but not encrypt the actual data. Prior to Windows Server 2012, the only way to encrypt file data in transit was to configure IPsec. SMB 3.0 encryption can be enabled, either per share or file server, without any special planning.
Sponsored

Fight Off the Bandwidth Bandits

Critical business apps taking a backseat to bandwidth-sucking streaming media, apps, or users? Sniffing out bandwidth bandits is quick and easy with SolarWinds® NetFlow Bandwidth Analyzer Pack (BAP).
Download Free 30-Day Trial

Disable SMB 1.o

Microsoft recommends that unless you have clients running Windows XP or earlier, you should disable SMB 1.0. Do this in a preproduction lab environment before rolling out the change to your production systems. However, there are still certain scenarios where SMB 1.0 is still required, such as when the computer browser service is enabled in Vista (or later).
Windows Server 2012 has a new PowerShell command that makes it easy to get the configuration status of SMB protocols on the server, and optionally enable or disable SMB protocol support.
To get the current SMB protocol status on Windows Server 2012: Logon to the server as a local administrator, open a PowerShell prompt from the Start screen or icon on the desktop Taskbar, and run the following command:
Get-SmbServerConfiguration | Select EnableSMB1Protocol, EnableSMB2Protocol
Check SMB protocol configuration in Windows Server 2012
Note that there’s no separate command to enable or disable SMB 3.0, as it cannot operate independently of SMB 2.1.
Now, run the following command to disable SMB 1.0 and confirm the action when prompted:
Set-SmbServerConfiguration -EnableSMB1Protocol $false
After that, run the first command again. You should see that SMB 1 has been successfully disabled.
Sponsored

Enable SMB 3.0 Encryption

You can enable encryption per file share or for the entire server. SMB 3.0 uses the AES-CCM algorithm for both encryption and signing. Using the same PowerShell cmdlet as above, run the following command to enable SMB 3.0 Encryption for all file shares:
Set-SmbServerConfiguration –EncryptData $true
To enable encryption for a specific file share, run the following PowerShell command, replacing <sharename> with name of the file share for which you want to enable encryption:
Set-SmbShare –Name <sharename> -EncryptData $true
When enabled, SMB 3.0 encryption will encrypt file data between devices that support SMB 3.0. Clients that don’t support SMB 3.0 will not be able to connect to the file server or share where encryption is turned on. While not recommended, this behavior can be changed by running the Set-SmbServerConfiguration –RejectUnencryptedAccess $false PowerShell command.
https://www.petri.com/configure-smb-security-windows-server-2012

Kamis, 01 Desember 2016

WEDNESDAY, MARCH 2, 2011

Pengertian Bootstrap

Bootstrap adalah Boot atau booting.
Dalam perangkat keras berarti proses mengaktifkan komputer sampai diambil alih oleh sistem operasi. Proses boot ini dikenal dengan dua cara, yaitu warm boot dan cold boot.Warm boot, berarti mengaktifkan kembali, tanpa harus dimatikan terlebih dahulu, misalnya dengan menekan tombol reset, atau memencet sekaligus tombol CTRL+ALT+DEL pada sistem operasi Disk Operating System (DOS).

Bootstrap loader adalah sebuah program yang cukup sederhana untuk dipanggil secara manual dengan pertolongan sakelar. Program ini mampu memanggil program pemanggil lain yang lebih kompleks sehingga dapat menjalankan program buatan sendiri.

Bootstrapping adalah pemuatan dan execution program bootstrap loader.Bootstrap ButtonAdalah tombol atau sakelar yang pertama kali akan ditekan apabila hendak menyalakan komputer. Penekanan tombol ini akan menyebabkan sistem operasi berhubungan dengan memori.

Bootstrap program adalah kode yang disimpan di code ROM yang dapat menempatkan kernel, memasukkannya kedalam memori, dan memulai eksekusinya
http://volkshymne.blogspot.co.id/2011/03/pengertian-bootstrap.html